
Thank you to David Jordan at Living Physics for the support. All mistakes are solely mine.
So, I tested 280nm UV light on baker’s yeast.
This was a ‘minimal trust’ investigation into wet lab experiments, to learn the subtleties of UV susceptibility data that I wouldn’t get by reading. My conclusion is that there are lots of sources of variability. It’s helped me calibrate myself on how fragile lab experiments can be in real world settings.
My main takeaways were:
it’s not easy to calculate the UV dose applied to an organism. In my setup, I found it pretty complicated, there is likely to be error across labs. I am wondering if there should be standardised UV dose methodology within the community. When I read papers from others that calculate their dose, there is a lot of math and a lot of assumptions. The amount of degrees of freedom here worry me.
sterilising your environment is very hard, and I really need to lock in in terms of improving the wet lab setup that I have at home. I also expect that for people doing independent science in general, that this is going to be a challenge. So in my next post, I’m going to try write more about sterile technique for home labs, and think this will be helpful for people experimenting with any type of biology with little experience.
I think the upside in doing independent experiments yourself is big. I learnt a bunch about sources of variability in experiments that wasn’t initially clear to me in the beginning. One big thing that could’ve happened would be if this experiment didn’t show any result at all. But, it did and I’m going to go through the first set of results. I’m lucky to be completely independent, so I don’t need to lie about the subtleties and can just say everything without worrying about whether its successful.
Here are the yeast colonies that grew after different doses of UV light, shown in the black text below each image. Whilst the samples are contaminated, you can see that there is a rough reduction in the colony density as we increase the dose. The third sample in the middle got completely contaminated, which is why you can’t see anything there (I wonder why…)
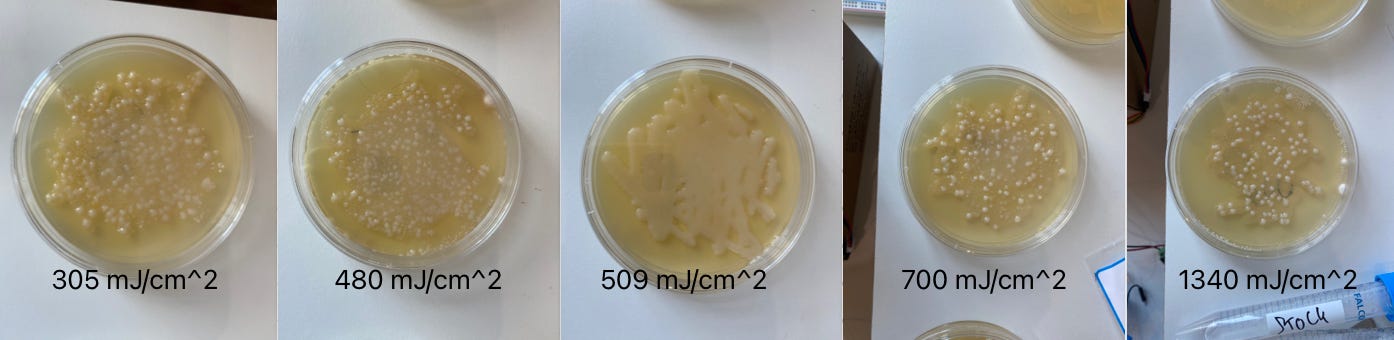
At this point, I didn’t bother doing the exact count because I’m planning to do a repeat of this experiment under better conditions, which I will write more on below. But, the initial run looks kind of promising. The first thing that I find kind of surprising is that the 1300mJ / cm^2 dose level didn’t completely eradicate the colonies, contrary to some papers I read that lead me to believe that I would have complete eradication at this level of dose. But again, I’ll tell you why these data anomalies might’ve occurred if you read on! :)
I first made the right concentration of yeast cells, by using the previous serial dilution method in my last post. Then, I ran the solution through a quartz cuvette with a 270-280nm UV light attached to it (UV can’t penetrate regular glass), using a pump. The setup is near identical to what I wrote in my last post on making an automated UV sterilisation pump, except I upgraded the pump so that it connected to a motor driver. the motor driver lets me change the flow rate without messing with duty cycles on my own.
Here’s a refresher: from left to right, we have the relay that connects to the UV LED which is mounted in a frame that points into the cuvette which holds the yeast solution. The black box with the blue circle on it is the peristaltic pump that pushes everything through. And the chip on the right is the motor driver, responsible for driving a range of pulses that can activate the pump at different speeds.
The routine went like this:
I took my yeast solution and put the pump tube in it.
I set the pulse mode on my computer to program a particular pump rate.
I then measured how long it took for pump to remove 1ml of solution, this would be used to calculate the flow rate.
I then collected the solution that was pumped through the UV light, and then spread it on the agar plate with a cotton bud put through boiling water.
Here was the emotional experience. The experiment took be about 3 hours because I was fiddling around with the test tubes, which makes it a pretty taxing! It’s also annoying to clean the test tubes, repeat serial dilutions, squat down to make sure I don’t get parallax error, etc. But overall, I had fun. Although, I can definitely see why the novelty might wear off for a researcher in the field.
Now, I’m going to list all of the details here that makes these sorts of experiments a bit tricky! This is the important part so please read on.
This is a mini tirade on the subtleties of the UV dose calculation. Given my experimental setup, I found that actually calculating the UV dose that I apply to the sample was pretty hard.
I found that estimating the actual dose give to the cuvette was pretty tricky, and was the hard part of the experiment. The UV goes through a quartz cuvette, and spreads out through it, which I modelled like a cone. The setup looks like this. The image on the left is the front of the front of the cuvette, where the rectangle in the middle is the window. On the right, I’ve illustrated what the UV ray looks like from the bolt. Hopefully I’ve illustrated the kind of fiddly process required to estimate UV dose.
Ok, so how did I calculate the actual dose given some flow rate? Here is a diagram from how the UV looks, but rotated for clarity. I used the technical data given from the light maker to estimate the intensity at the start of the cone, and at the end.
To calculate the exact dose, I did an average of the start and end intensity (but to be honest this is a bit suspect, I should have done a weighted integral), calculated the volume of the cone, and then calculated the dose with the equations below. Note that this kind of thing relies on the assumption that the light maker is actually declaring the right intensity at those distances. It also assumes that I’m modelling the cone as some discrete shape - but its not because the intensity fades as you go away.
Basically, measuring actual dose is hard. For now, my prior is that these sort of measurements might be the cause of variability in experiments, as opposed to genuine physical reasons, but I need to think about this more.
That being said, here is an example of the dose calculation for the given flow rate of 0.01cm^3/s.
In terms of gear, the actual UV light was an Oznium UV Sterilisation LED bolt.
I used a peristaltic pump connected to a Pololu motor driver to control the flow rate. Motor drivers let you control the flow and Pololu has a GUI that makes it easy.
Peristaltic pumps work like your intestine, by squeezing and pinching, moving the solution along. Because of this, one must also bear in mind the subtle detail that the water moves in a pulsed motion, not in continuous flow, which also makes it different to scenarios you might actually think to use UV in. This also adds a bit of ambiguity to estimating the flow rate.
When running the pump, you have to calibrate the pulse rate to the flow rate, and the way I did this was measuring how long it took to have 1ml solution taken into the pump. I used the gradations on my tube to do this, which is subject to parallax / meniscus error of course.
Pump flow experiments are susceptibile to contamination. In this experiment, the contamination could’ve come from the tubing, having to have the tube open, the cotton bud, or any number of sources. So, for the next iteration I’ll be using more sterile technique, including an ethanol lamp to create a sterile field, as well as flame burning the glass rod that I’m using to spread the agar plates on.
This is something that is pretty much tacit knowledge, and I really think that more blogs on how to sterilise, clean, and do the mundane shit would be really useful to independent scientists. I’m planning on filming some of these things too with a body harness that can hold my phone as a camera, so stay tuned!