What's the plan?
At the end of our previous blog post, we got PreBoard to show its UI. But we had no idea if getting SpringBoard to work would even be possible, since we didn’t have SEP emulation. Still, we wanted to see how far we could get without it.
Before SpringBoard could show anything, we had plenty of issues to fix. Although the backboardd and SpringBoard processes were starting and stable, they were stuck in different places.
Our strategy was to go through system logs, find suspicious errors or warnings, then reverse backboardd, SpringBoard, and their supporting frameworks (BackBoardServices, QuartzCore, SpringBoardFoundation, etc.).
Userspace debugging
Let’s preface by saying that, when starting this project, we had very limited experience working with Apple development tools and environment, and we also wanted to keep working in Linux as much as possible.
A lot of the work detailed in these blogposts required plenty of userspace debugging, and the way we handled it evolved with our knowledge and our needs.
Symbols from the dyld cache
The biggest improvement of all was to find a way to disable dyld cache ASLR by patching the kernel. Previously, we only had KASLR and userspace process ASLR disabled.
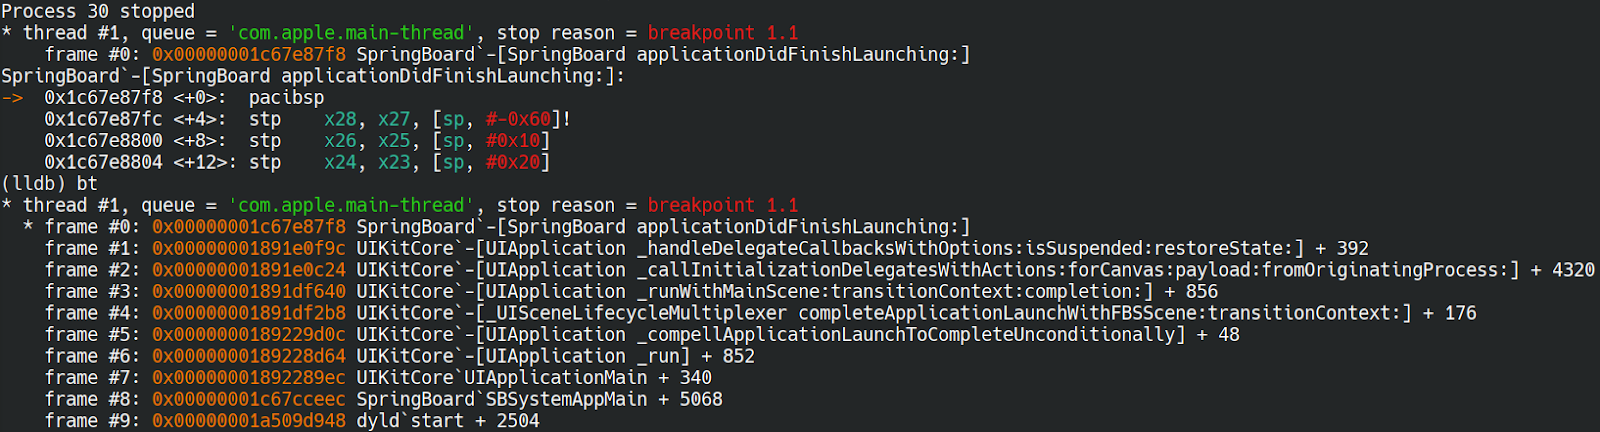
With the dyld ASLR disabled, we could get fully symbolized stack traces with lldb and debugserver running on iOS (exposing its port with iproxy). Although at first it took a very long time to attach to a process, because lldb would get all the libraries used by a process from memory.
We found out we could directly point to the dyld cache we had extracted with ipsw tool to use the symbols from the rootfs of the host instead:
- Extract the dyld cache from the ipsw file:
ipsw extract -d iPhone11,8,iPhone12,1_14.0_18A5351d_Restore.ipsw - Extract all libs from the dyld cache:
ipsw dyld extract -a dyld_shared_cache_arm64 -o dylibs - Then in lldb:
platform select remote-ios --sysroot iPhone11,8,iPhone12,1_14.0_18A5351d/dylibs
This made attaching significantly faster.
Debugging userspace and kernel at the same time
Another cool trick became possible with dyld ASLR disabled: we could use the gdb stub from QEMU attached to the kernel to debug userspace libraries. Indeed, without ASLR, all libraries from the cache are mapped at the exact same address in every single process.
This meant we could:
- Add a breakpoint for a framework, and it would trigger and every single process calling that code
- Follow code from kernel space to userspace and back to kernel space
- Add instant userspace breakpoints without needing to attach anything to userspace
- Debug early userspace code that we couldn’t attach to (because the USB stack wasn’t ready yet for instance)
Many frameworks have limited usage, like SpringBoard is only used by its matching process, QuartzCore is used by backboardd and SpringBoard…
So in practice for our debugging purposes it wasn’t hard to identify the process when breaking in a framework’s code.
That solution doesn’t give a symbolized stack trace (although you get the same virtual addresses as shown in your favorite disassembler), but gives a lot of flexibility otherwise, and allows quick debugging of userspace without setup in iOS and without attaching which can cause process crash or alter its behavior.
The never ending progress bar
As mentioned in our previous blogpost, we had reached a point where an Apple logo with a progress bar would show but never finish.
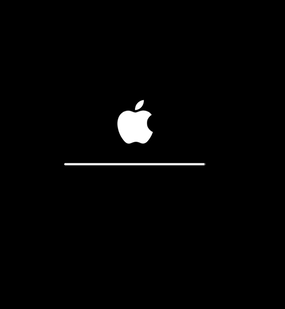
Going through the system logs showed multiple processes, including backboardd and SpringBoard, were waiting on an operation called data migration.
Our understanding at the time was that this operation was mainly necessary for going from one version of iOS to another and probably setting up some stuff in the KeyBag. Two things we didn't care about, so we decided to try moving on without it.
After some reversing we managed to do it by patching:
The com.apple.datamigrator to simply skip that phase entirely
The BackBoardServices framework to avoid backboardd waiting on the data migration phase
With the data migration skipped, we noticed SpringBoard was starting to be active in the system logs, but it still wouldn’t show anything, leaving us with a black screen.
SpringBoard
On a real device, one can detect that SpringBoard is properly initialized when -[SpringBoard_applicationDidFinishLaunching:] returns. This function sends a system notification which can be watched with notifyutil -g com.apple.springboard.finishedstartup.
So we knew that we needed to at least reach that point to consider SpringBoard properly started.
Since SpringBoard was still not showing anything, we thought it had to be stuck on something and indeed we had, yet again, to patch code in various locations.
SEP
Since we didn’t emulate the SEP, the calls related to it were our main suspects. Mainly we ended up patching:
- Code related to the device locking in the
MobileKeyBagframework used by system services for storing/using encryption keys - Code related to user authentication in the
SpringBoardFoundationframework - Code related to biometric authentication in the
SpringBoardframework
Of course SEP wasn’t the only hardware part we didn’t emulate, and we noticed a process called CommCenter kept crashing in a loop and prevented SpringBoard from finishing its init.
Baseband
Apparently this daemon seems to handle cellular related operations, and since we didn’t emulate the iPhone baseband this was probably the issue. Until now, IOS had surprised us with its ability to gracefully accept lack of hardware, but the baseband was apparently too much.
For this one, all we had to do was to disable the CommCenter service at runtime with launchctl, and as soon as we did that a white screen finally showed up!
And finally, it was the first time we had a stable display with SpringBoard working!
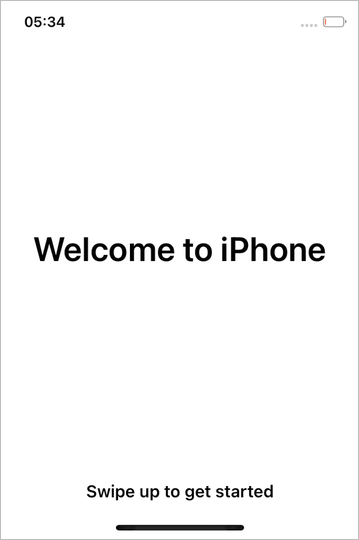
That screen was the first screen of the initial iOS setup you get when you start an iPhone for the first time.
Our first, first install
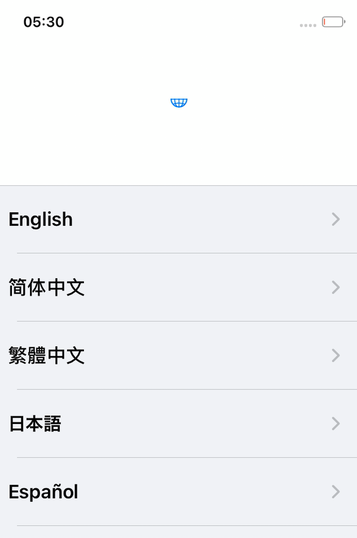
After unlocking with a keyboard event, like we did previously with PreBoard, we got presented with a second screen where we needed to select the language in a list.
Things got tricky here, because we had no input device in QEMU detected by iOS, and the touch input injected by VNC was refused by backboardd (complaining about a non-digitizer device).
Fortunately, we found once again a workaround for this, and enabled (with a bit of button mashing), the iOS accessibility mode. With this activated, we could (painfully) select elements in the UI with mouse or keyboard events and then validate it with a double click.
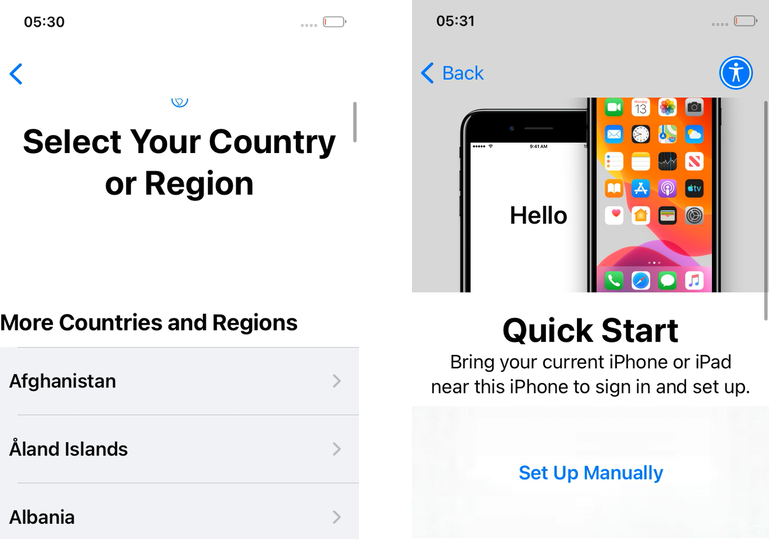
From there, we managed to move through the different setup screens without any issue.
One screen would try to activate the phone with iTunes, which obviously we couldn’t do. Some patching in the mobileactivationd daemon was enough to avoid needing that operation.
For later work we just entirely skipped that initial installation phase by putting a full configuration file at /var/mobile/Library/Preferences/com.apple.purplebuddy.plist and then rebooted.
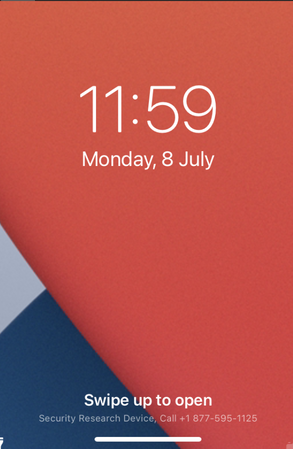
After finishing the first installation phase manually we were presented with that screen:
Swipe to unlock
After finishing the initial setup and rebooting, we finally got presented with the normal unlock screen of iOS 14.
Low power
Unfortunately, as soon as the screen showed up, the device would start powering off, not even letting us time to take a victory screenshot.
It turned out iOS is trying to enter what they call System Idle Sleep, which would cause the phone to enter a low power state.
This low power mode was not implemented in QEMU, and would instead just power off.
So we patched away the code trying to enter that idle sleep mode in backboardd, and the FrontBoard framework.
Backlight
Still, the system would boot, show the lock screen, and then the screen would turn black again but the idle sleep wasn’t enabled. The system logs indicated the screen was being turned off, but we couldn't turn it on again. At the time there was no emulated backlight hardware, so we couldn’t handle properly turning off and on the screen. This was easily patched in the SpringBoard framework, making the screen always on to avoid issues.
The system logs showed us two things:
- iOS would turn off the screen and we had no way at the time to turn it back on
- iOS would go into “idle mode”, a feature we don’t emulate
So once again, we patched these behaviors in a few places: SpringBoardFoundation, backboardd, FrontBoard and the SpringBoard framework.
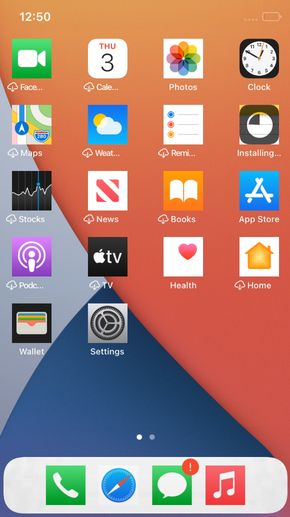
After these modifications, we finally managed to do our first unlock and reach the home screen !
Note: you’ll notice that screenshots shown in this blogpost are not always the same format. This is because we didn’t work initially with the native iPhone 11 resolution, so it caused some parts on the UI to not be shown and some icons to be square.
Metal or not Metal
Still using the accessibility mode to navigate, we then tried to start simple apps, like the system Preferences, but it would instantly crash SpringBoard.

After some investigations, we found out that even though QuartzCore uses its software renderer, it still has hardcoded reference to a Metal context. So it means, on a real iPhone with an actual GPU, you can indeed force the software renderer, but not in our case (or at least not with a production firmware).
So, in some cases, QuartzCore was trying to do some rendering using Metal, and our context being null, SpringBoard would just segfault.
Hopefully there are very few instances in QuartzCore where this happens, and since we don't handle Metal anyway it would just mean that some rendering wouldn’t work properly without it.
After carefully patching QuartzCore, so that it doesn’t use a Metal context anymore but still functions normally otherwise, we could finally start our first application.
Multitouch support
We had the ability to navigate and start apps, but it was frustrating because the accessibility mode was painful to use and wouldn’t let us do things like swiping. So we started looking into getting our injected events accepted by backboardd.
Some reversing and experimentation done on a real iPhone taught us a few things:
To inject touch events (created with IOHIDEventCreateDigitizerFingerEvent), you need to have an existing AppleMultitouchDevice IO service
If you don’t have a multitouch device, the accessibility device id allows overriding that restriction, but at the cost of not handling touch events normally
As long as you have a multitouch device, you can inject multitouch events by impersonating its device id
So the backboardd warnings about non-digitizer events were simply because we couldn’t find any AppleMultitouchDevice IO Service to impersonate, and got a null service id instead.
Our objective was to get the multitouch working as fast as possible. And our intuition was that, as soon as an AppleMultitouchDevice service would be listed by the system, our VNC injection would start to work (like it did on real devices).
So our aim was to have a minimal stub implementation in QEMU that emulates the multitouch initialization but wouldn’t need (at least at that time) to go into handling the events themselves.
It also seems like using events injection might give us some sort of abstraction layer, avoiding issues if other iOS versions needed variations in the communication protocol.
Updating the DTB
Because there was plenty of hardware not yet emulated, some entries of the DTB we disabled in QEMU to avoid some behaviors or issues at runtime. So the first step was to check those related to multitouch hardware and re-enabled them.
Then using the ioreg command at runtime we could start comparing a device working multitouch and the emulator and see what services were missing.
On the emulator:

On a real device:

We can see that we’re missing the HIDTransportDeviceSPI and all its sub-entries leading to the AppleMultouchDevice.
New device in QEMU
We know from the DTB and kexts that the multitouch device communicates using the SPI protocol. So the first task was to create a new device in QEMU, that would communicate on the SPI bus.
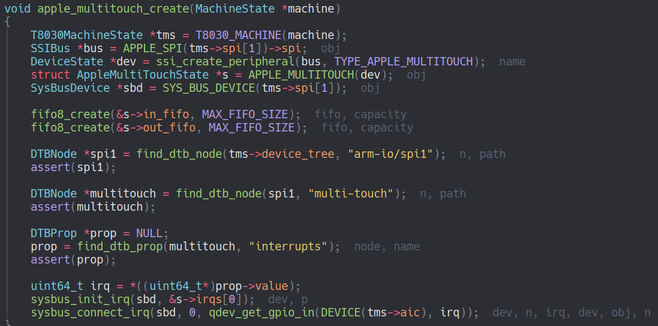
We were expecting some communication at boot when the kernel would start probing the device, but the data callback of our device was not triggering.
After reversing the AppleGenericMultitouchDriver kext showed us that AppleGenericMultitouchDecider::start can use two kernel boot args agm-genuine and agm-trusted to bypass the authenticity check of the hardware. Our hardware being anything but genuine we tried these and we finally got some communication activity.
The next was about implementing the minimum amount of communication so that the kernel would finish probing and initializing the device. This included the kernel trying to send a firmware and a few commands to set up the device.
All of these were handled by either:
- Implementing the proper answers to specific commands in the
QEMUdevice (by reversing theAHTProtocolHBBP13class) - Or bypassing firmware loading and commands signature verification in the kernel
This took a lot of trial and error, and quite a few restarts of the emulator, but in the end we finally got the multitouch service to show up.

VNC mixing
At that point, we had a working injected event without having to implement anything more in the QEMU device. However, using the multitouch was still awkward because we had two different VNC servers:
One exposed by QEMU for the display
One running in iOS (and exposed through iproxy) for the events
This would force us to use two VNC windows, one with display and no inputs, and another without display but with inputs. Not really ideal…
So we ended up making a simple tool exposing a VNC server, which would connect to 2 VNC servers, one for display and one for input. That proxy VNC server would then basically forward inputs and draw events to the proper server. Doing this we could connect to our proxy, and get at the same time, display and inputs.
With this solution we finally had a natural way to interact with the iOS interface.
After successfully getting UI and multitouch support, we quickly realized most applications required access to the internet to be useful. When we started brainstorming on how to get network support, we started poking in the xnu kernel network kexts.
It seemed that we couldn’t find anything about a PCI network adapter, and only USB adapters were supported. And indeed we verified that a physical iPhone can get an ethernet network interface through any generic USB adapter (connected with a lightning connector).
We threw a few ideas around:
- We could try to re-enable support for external kexts (like on macOS) in xnu
- We could try to adapt an aarch64 kext for macOS for either an USB or PCI network
- We’d need to find or implement such a device in
QEMU
Looking for a simpler approach, we were trying to set up a reverse proxy, but the single direction of iproxy wasn’t practical for this.
And then we found out there is an actual built-in reverse tethering feature exposed by the iPhone. We tested this on a physical device, and indeed we could share our internet connection as long as the phone was paired with the computer.
Fortunately, as mentioned in our previous blogpost, we had patched lockdownd to allow pairing with the emulated iOS without a functional SEP.
So in theory, there was nothing preventing us from getting access to the internet using reverse tethering, and indeed it was quite simple to set up.
What we needed to do to get it to work:
- Use a more recent versions of idevice tools
- Start usbmuxd with the environment variable
USBMUXD_DEFAULT_DEVICE_MODE=3 - Configure a network interface for the cdc_cdm device (
[ 4907.045126] cdc_ncm 1-1:5.2 usb0: register 'cdc_ncm' at usb-0000:00:03.0-1, CDC NCM (NO ZLP), be:de:48:00:11:dd) - Setup DHCP and DNS servers listening on that new interface (we used dnsmasq)
- Start iOS
- Pair the host with the emulated iPhone (you should see the DHCP request at this point)
- Profit
This works because usbmuxd (when using the proper environment variable) exposes the iPhone network USB device, which allows us to set up a network interface on the companion.
All the network traffic from then goes through that interface, and the DHCP and DNS request are handled by dnsmasq running in the companion VM.
Default apps
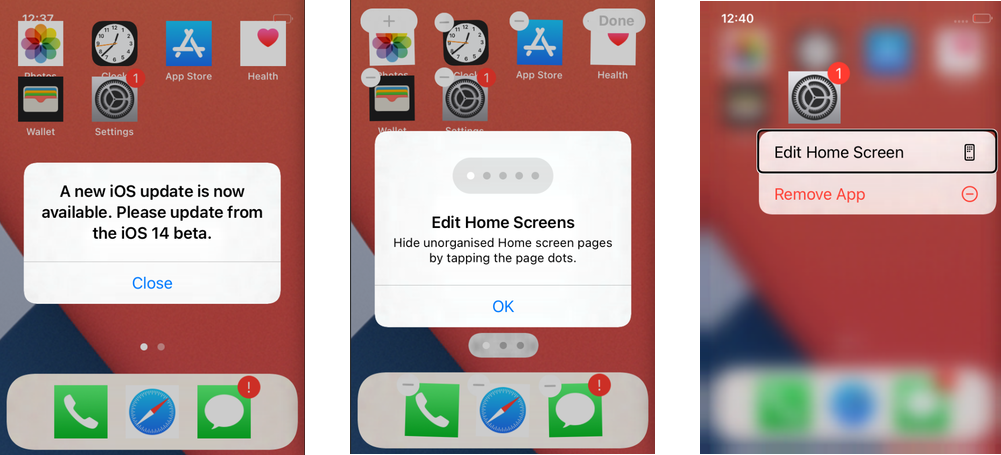
When we started being able to launch applications, we were a bit frustrated because after the first boot there were very few installed by default:
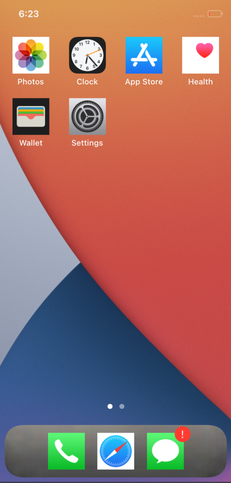
The missing applications like the Notes, Calculator or News, were actually in the filesystem but not accessible to SpringBoard. However there was a very simple way to get them to show up, by installing them ourselves:
- Copy the directory like /private/var/staged_system_apps/News.app to /Applications
- Run
uicache -p /Applications/News.app - Read the news
With this we could re-add any default system application manually, but we still wondered why they weren’t being installed by default like for a physical device.
And of course, it was the migration phase that we skipped previously !
We could live without these, but later we found out that when doing our first install and first boot with a network access, then iOS would automatically start downloading and installing these apps.
Other apps
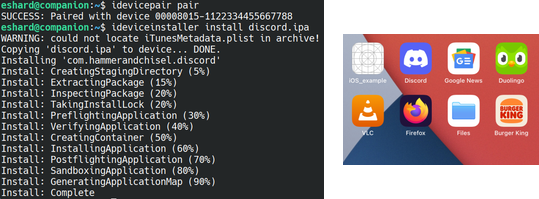
Once we had the network, and most default iOS apps working we obviously wanted more. But of course without a functional App Store our choices were very limited.
Thankfully the iOS jailbreaking scene is very active, and created the tools to install and run any arbitrary (non encrypted) ipa (whether or not it is signed for the device).
Multiple frameworks make it possible to hook system components and inject objective C code, overriding their behavior (the libs containing that new code are usually called tweaks).
One open source tweak called AppSync builds two libraries:
- AppSyncUnified-installd.dylib : patches the
installddaemon (libms dylib) to circumvent the ipa signature check when installing it
And because it builds with theos, we had no problem building it directly from Linux.
Using that solution, we could install our ipa files from the companion using the ideviceinstall tool and run them in the emulated iOS.
We can in theory launch any application, although in practice there are limitations mainly related to:
- Non-emulated hardware components usage (SEP, GPS, Bluetooth, Camera…)
- Minimum version allowed (most current apps are starting to be restricted to iOS 15/16+)
- Mandatory Metal rendering
So there we have it, iOS emulated in QEMU with:
- Restore / Boot
- Software rendering
- Kernel and userspace debugging
- Paring with the host
- Serial / SSH access
- Multitouch
- Network
- Install and run any arbitrary ipa
Stay tuned for our future work, our current objectives are:
- Getting the iOS emulation integrated into our esReverse platform
- Porting the solution to newer iOS versions
- Getting KVM support