What looked like a rendering bug turned out to be a clever JPEG decoding optimization in Chrome.
This icon looks better on my colleague’s computer
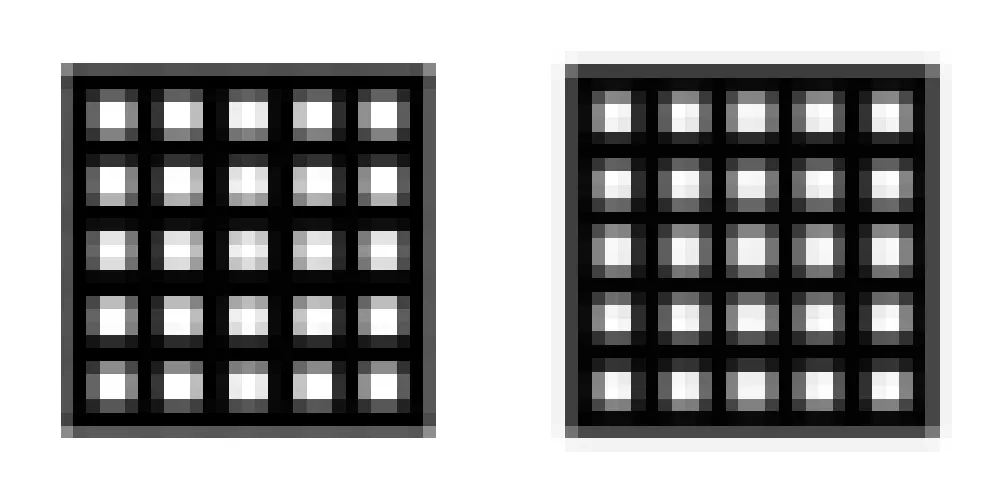
A while back, when chatting with a colleague over their computer, I noticed that a logo did not look exactly the same as it did on mine. It looked thinner on theirs and more faithful to the original image. It was rendered at 15px; here is an upscaled version.
Note: this was not the original image. It happened a while ago, so I made a new image to demonstrate the issue.
 On the left, Firefox; on the right, Chrome.
If you squint, or take a step back, the one from Chrome looks thicker. A bit weird, but swapping the image for an SVG fixed it. Still, I was curious: why was it rendering like this in the first place?
I did some digging and found a nifty optimization that Chrome uses when rendering JPEGs at small scales.
Scaling down images can be wasteful
The intuitive way to render a small image from a JPEG is to fully decompress it in memory and then scale it down.
But that is not always efficient.
Imagine a 2000 × 2000 JPEG that needs to be displayed at 20 × 20. Once uncompressed, the image takes far more memory than the final result. A bitmap of the full image uses roughly 12 MB, while the final 20 × 20 image needs only about 1.2 KB. Most of the information in the large version is lost when scaling down.
What information is lost when scaling down?
An interesting insight is that the information lost is not random.
When an image is scaled down heavily, the information that disappears is mostly the high-frequency detail. This is easy to see intuitively. Think of a tree with lots of leaves and rough bark: those fine details change quickly from pixel to pixel, so they count as high-frequency information.
If you scale that tree down to something tiny, like 20 × 10, you end up with just a green blob at the top for the foliage and a brown stick at the bottom for the trunk. The scaled-down version has thrown away the fine detail, the high-frequency information.
 Illustration of a tree being scaled down
Some of that high-frequency information still survives to an extent, because the details get mixed together.
How JPEG stores image data
I will keep this explanation light on jargon and math, but I will still mention a few technical terms that can be good starting points if you want to dig deeper. I will also skip a fair chunk of the full JPEG transformation, because it is not needed here.
During JPEG compression, images are split into 8 × 8 blocks that are converted into the frequency domain. This operation is called a DCT (Discrete Cosine Transform).
In an 8 × 8 block, the lowest possible frequency is a flat color. Strictly speaking, it is not really a frequency because nothing changes; it is the constant component. At the opposite end, the highest frequency looks like a checkerboard, where the value changes as much as possible. Everything in between represents the rest of the frequency domain. These are called basis functions.
 The basis functions: you can see the flat color in the top-left, and the checkerboard in the bottom-right.
So converting an 8 × 8 block into the frequency domain is basically asking: how much of each pattern is present in this block? Those amounts are called coefficients.
JPEG compression has a few more steps after that to store those coefficients efficiently, and that is where the lossy compression happens. But that part is not important for what we are discussing here.
Putting it together: rendering a JPEG at 1/8 scale
Now let’s say you want to shrink an image by a factor of 8.
Those 8 × 8 blocks I mentioned earlier can now be represented by a single pixel in the downscaled image. At that size, the image mostly needs low-frequency information because, as in the tree example, the high-frequency details mostly disappear during scaling.
So instead of decompressing the whole JPEG, we can skip the coefficients for the high-frequency parts and use only the ones needed for the coarse version of the image. That gives a scaled-down result without fully expanding the original image first.
The decoded image takes less space and is faster to uncompress, since we are skipping a good chunk of the coefficients.
This can be extended to other ratios, as long as they are fractions with a denominator of 8. The technical name for this is partial IDCT scaling*. See jpegclub.org (if you read a bit on this, you will see that this technique can also be used to upscale images!).
* Inverse discrete cosine transform: taking the frequency domain back to the image domain.
How Chrome fits in
Chrome delegates image decoding and rendering to Skia. For JPEGs, Skia uses libjpeg-turbo, which implements partial IDCT scaling. That lets it decode only the lower-frequency data when the target size is small enough.
In other words, Chrome/Skia does not always decompress the full image and scale it afterward. It computes the closest fraction with a denominator of 8 and decodes the image at that scale. It then scales the image further using a more traditional downsampling algorithm until it reaches the desired size.
That is why the image looked thicker on my machine. Because it was rendered so small, it was decoded at one-eighth scale using partial IDCT scaling. So the only data from the frequency representation that remained was the constant component; all the edge softening and gradients were not used.
Really, the moral here is that you should not use JPEG for icons and the like. The format and its optimizations are designed around our perception of photos.
After all, it is in the name: Joint Photographic Experts Group.