In the previous article we added the two standard JWKS discovery endpoints to our authentication server.
As part of the OpenId Connect (OIDC) protocol, the first of these endpoints enables an API to discover where the other relevant endpoints are and the second endpoint publishes the public keys that clients use to verify the RSA-256 signatures on the JWT's that we issue.
The previous version of the implementation that we've been working on only ever served a single key, though. In this article we’re going to change that.
We’ll implement proper key rotation so we can safely swap signing keys on a schedule, while still allowing any tokens signed with older keys to keep working until they expire.
To make it all work cleanly we’ll store the keys in Redis. This gives us automatic expiry (so rotation happens without any cron jobs), and because the keys live in the cache they survive application restarts and deployments too.
There is a repository on GitHub that you can clone, run and debug if you want to see the code I'm talking about in this article. I've basically taken the code from the previous article and added some extra features. It's those additions are what I'll be explaining in the article.
This article's code: https://github.com/aaroncpina/Aaron.Pina.Blog.Article.08
Previous article's code: https://github.com/aaroncpina/Aaron.Pina.Blog.Article.07
The recommended approach is to take the previous article's code and add to it yourself as you read the article. That way you'll "get your hands dirty" as they say, which is going to help the concepts stick in your mind. But if you want to just use the already prepared code, that's fine too.
Okay, let's start!

Why key rotation matters
Using a single static signing key works fine for demos but in production, it's not good enough.
Security best practices and compliance standards such as PCI-DSS, ISO 27001, etc, require cryptographic keys to be rotated on a regular schedule. That usually means every 30–90 days or so.
As PCI-DSS says:
- Key rotation limits the amount of information available for cryptanalysis, protected by a particular key.
- Key rotation limits exposure when malicious or unknowingly compromised a particular key.
- Key rotation prevents inevitable cryptographic catastrophes.
- Protects against current or future algorithmic vulnerability that shortens key life.
So the strategy we're going to use is:
- Allow revocation of keys (public and private) by admins.
- Facilitate automatic rotation of signing (private) keys every 90 days or less.
- To ensure that tokens signed with rotated keys still work, the public keys (which are used to validate JWT's) from the key pair are retained for 365 days.
Now that I've explained why we're doing it, I'll show you how we're going to do it.

Why and how we're using Redis to cache JWKS
We already used Redis in the article on revoking JWT's. There are several good reasons to use Redis for this purpose, but the main ones we're interested in are:
- It's blazingly fast.
- It's really simple to use.
- Records are automatically removed when they expire.
You may recall that Redis is essentially a key-value store. When we used Redis for our blacklist in the previously mentioned article, we stored the JTI for the JWT that we were revoked with a "redis-blacklist" prefix, as we can see in our static Configuration class:
  public static class RedisCache
  {
      public static void Options(RedisCacheOptions options)
      {
          options.Configuration = "localhost:6379";
          options.InstanceName = "redis-blacklist";
      }
  }
In this article, we'll retain the Configuration option but drop the InstanceName and instead create a RedisKeys class to create prefixes for the keys of our Redis records (because now we will have several categories):
public static class RedisKeys
{
    private const string Root = "jwt-server";

    public static string Blacklist(string jti)  => $"{Root}:blacklist:{jti}";
    public static string CurrentKid()           => $"{Root}:jwks:current-kid";   // points to the active signing key
    public static string PrivateKey(string kid) => $"{Root}:jwks:private:{kid}"; // full private material (short life)
    public static string PublicKey(string kid)  => $"{Root}:jwks:public:{kid}";  // public material only (long life)
    public static string KeyHistory()           => $"{Root}:jwks:key-history";   // simple list of every KID we have ever used
}
To explain why we're doing this, it's to do with conventions for using Redis. Unlike relational databases, where we can separate different types of data into tables, there is no such mechanism for that in Redis. So, the best way to ensure that keys are unique and don't conflict is to separate them with colons.
So now everything has the prefix "jwt-server", but blacklisted JTI's now start with "jwt-server:blacklist:" and anything to do with the JWKS implementation that we're working on now starts with "jwt-server:jwks:". There are four different types of datum that we're going to store in Redis related to key rotation and I'll explain each one below.

Storing our RSA keys
But first I'm going to show you a very small class I made:
public class RsaKey
{
    public string Kid      { get; init; } = string.Empty;
    public byte[] Modulus  { get; init; } = [];
    public byte[] Exponent { get; init; } = [];
    public byte[] D        { get; init; } = [];
    public byte[] P        { get; init; } = [];
    public byte[] Q        { get; init; } = [];
    public byte[] Dp       { get; init; } = [];
    public byte[] Dq       { get; init; } = [];
    public byte[] InverseQ { get; init; } = [];

    public RsaKey(RSAParameters p, string kid)
    {
        Kid      = kid;
        Modulus  = p.Modulus  ?? [];
        Exponent = p.Exponent ?? [];
        D        = p.D        ?? [];
        P        = p.P        ?? [];
        Q        = p.Q        ?? [];
        Dp       = p.DP       ?? [];
        Dq       = p.DQ       ?? [];
        InverseQ = p.InverseQ ?? [];
    }

    public RsaKey() { }

    public RSAParameters ToRsaParameters() => new()
    {
        Modulus = Modulus, Exponent = Exponent, D = D, P = P, Q = Q,
        DP = Dp, DQ = Dq, InverseQ = InverseQ
    };

    public RSAParameters ToPublicRsaParameters() => new()
    {
        Exponent = Exponent,
        Modulus = Modulus
    };
}
Okay, so I was joking, it's not a small class. However it's quite easy to understand. In the last article, we wrote a /.well-known/jwks.json endpoint to get a public key for validating JWT's. If you haven't already tested it yourself, you might expect it to return a string or something. But in actual fact it returns a JSON object with a bunch of random-looking keys.
The JSON that it returns are the security key parameters. Don't ask what they represent, because that would require a long, boring article about mathematics, which nobody wants to read and I sure don't want to have to write.
Suffice it to say, that if you want the public and the private key, you need all the parameters, but if you just want to the public key, you only need the exponent and the modulus. So that's what we have here.
I don't really need to explain the RsaKey class any further than that because it's basically just a DTO that we're going to use to serialise security keys into JSON and store in order to store them in Redis cache.
Before I go into that part of the article, I'm going to you show you some configuration settings. Here is the updated appsettings.json:
{
  "JwksConfig": {
    "PrivateKeyLifetime": "90.00:00:00",
    "PublicKeyLifetime": "365.00:00:00"
  },
  "TokenConfig": {
    "AccessTokenLifetime":   "00.00:10:00",
    "RefreshTokenLifetime": "180.00:00:00"
  }
}
All I did was to reformat the TokenConfig that we created several articles ago to return a more readable value (which will be read as a TimeSpan in configuration) and added a JwksConfig with the lengths of time that we want our public and private keys to be stored for.
TokenConfig is reformatted as such:
public class TokenConfig
{
    public TimeSpan AccessTokenLifetime  { get; init; }
    public TimeSpan RefreshTokenLifetime { get; init; }
}
And JwksConfig looks like this:
public class JwksConfig
{
    public TimeSpan PrivateKeyLifetime { get; init; }
    public TimeSpan PublicKeyLifetime  { get; init; }
}
We configure dependency injection to get their values like this:
builder.Services.Configure<JwksConfig>(builder.Configuration.GetSection(nameof(JwksConfig)));Okay, so let's go onto the meat of the article, which is the new JwksKeyManager class.

Managing key rotation and revocation
Alright, here's the magic class. I thought about showing you the whole thing in one go, but what I'm actually going to do is split it up and explain bits of it one at a time. Hopefully that'll be a more interesting and less confusing approach.
public class JwksKeyManager(IDistributedCache cache, IOptionsSnapshot<JwksConfig> options)
{
    private readonly DistributedCacheEntryOptions _privateKeyOptions = new()
        { AbsoluteExpirationRelativeToNow = options.Value.PrivateKeyLifetime };

    private readonly DistributedCacheEntryOptions _publicKeyOptions = new()
        { AbsoluteExpirationRelativeToNow = options.Value.PublicKeyLifetime };
}
Starting with the parameters, the IDistributedCache is the Redis instance. The IOptionsSnapshot<JwksConfig> is the configuration object that carries the lifetimes for the JWKS public and private keys that are read from the appsettings.json file.
When we add records to the Redis cache, if we set the expiration time, Redis automatically deletes the record when it expires. This is actually the key to how our JWKS implementation will work.
IOptionsSnapshot<T> is scoped, so we need to register the JwksKeyManager with a scoped lifetime:
builder.Services.AddScoped<JwksKeyManager>();The DistributedCacheEntryOptions that we're setting up on instantiation of the JwksKeyManager are used by the Redis cache in the other functions that I'll explain below.
The first function I want to talk about is this one:
public async Task<RsaSecurityKey> RotateSigningKeyAsync()
{
    using var rsa = RSA.Create(2048);
    var kid = Guid.CreateVersion7().ToString();
    var (publicJson, _) = SerialiseKey(rsa, kid, false);
    var (privateJson, privateParameters) = SerialiseKey(rsa, kid, true);
    await cache.SetStringAsync(RedisKeys.PrivateKey(kid), privateJson, _privateKeyOptions);
    await cache.SetStringAsync(RedisKeys.PublicKey(kid), publicJson, _publicKeyOptions);
    await cache.SetStringAsync(RedisKeys.CurrentKid(), kid, _publicKeyOptions);
    await AddKidToHistoryAsync(kid);
    return new RsaSecurityKey(privateParameters) { KeyId = kid };
}
Every time this function is called, it creates a new security key and stores it in Redis.
The RsaSecurityKey (including the private key) is what we use to sign JWT's. It relies on this SerialiseKey helper class below. It exports the public or private parameters from the RSA, maps them into an instance of the RsaKey DTO class that I showed you earlier and serialises it into JSON:
private static (string, RSAParameters) SerialiseKey(RSA rsa, string kid, bool includePrivate)
{
    var parameters = rsa.ExportParameters(includePrivate);
    var key = new RsaKey(parameters, kid);
    var json = JsonSerializer.Serialize(key);
    return (json, parameters);
}
I'm creating the kid (the Key Id) as a V7 Guid because besides the fact that it creates a unique identifier, it's more easily sortable. However, you can just use a normal Guid or any other unique ID if you want.
Okay, so you can see the three cache.SetStringAsync calls. I'll explain what I'm doing here. The first call stores the signing key (which includes the private key) for 90 days. The second call stores the public key for 365 days and the third call stores the kid for the currently active security key (again, for 365 days).
We have to do this stuff to make sure the keys expire at the right times. There's actually one more call to the cache, which is done in the AddKidToHistoryAsync function:
private async Task AddKidToHistoryAsync(string kid)
{
    var history = await GetKeyHistoryAsync();
    if (history.Contains(kid)) return;
    history.Add(kid);
    var json = JsonSerializer.Serialize(history);
    await cache.SetStringAsync(RedisKeys.KeyHistory(), json, _publicKeyOptions);
}
As you can see it's checking the key history (below) and adding the kid to it if it doesn't already contain it.
private async Task<List<string>> GetKeyHistoryAsync()
{
    var json = await cache.GetStringAsync(RedisKeys.KeyHistory());
    return json is null ? [] : JsonSerializer.Deserialize<List<string>>(json) ?? [];
}
The key history is a List<string> so it's a bunch of V7 Guid serialised as a JSON array. This is what enables us to loop through all of the security keys; by getting each key once at a time for each kid. I'll show you the next function, where I do exactly that:
public async Task<JsonWebKeySet> GetAllPublicKeysAsync()
{
    var kids = await GetKeyHistoryAsync();
    var jwks = new JsonWebKeySet();
    var dead = new List<string>();
    foreach (var kid in kids)
    {
        var key = await LoadKeyAsync(kid, false);
        if (key is null)
        {
            dead.Add(kid);
            continue;
        }
        var jwk = JsonWebKeyConverter.ConvertFromRSASecurityKey(key);
        jwk.Alg = SecurityAlgorithms.RsaSha256;
        jwk.Use = "sig";
        jwk.Kid = kid;
        jwks.Keys.Add(jwk);
    }
    if (dead.Count > 0) await PruneDeadKidsAsync(kids, dead);
    return jwks;
}
This function is the one we'll use to get all of the public keys and send them in the response on the /.well-known/jwks.json endpoint.
This looks very much how that endpoint was implemented in the last article. As you can see it's pretty much the same, except we're getting the security key from Redis instead of from the RsaKeyProvider (which we won't need any more, so we can delete it).
There are two other functions to look at. I'll show you them and explain them.
private async Task<RsaSecurityKey?> LoadKeyAsync(string kid, bool includePrivate)
{
    var keyName = includePrivate ? RedisKeys.PrivateKey(kid) : RedisKeys.PublicKey(kid);
    var json = await cache.GetStringAsync(keyName);
    if (json is null) return null;
    var rsaKey = JsonSerializer.Deserialize<RsaKey>(json);
    if (rsaKey is null) return null;
    var parameters = includePrivate ? rsaKey.ToRsaParameters() : rsaKey.ToPublicRsaParameters();
    return new RsaSecurityKey(parameters) { KeyId = kid };
}
LoadKeyAsync does basically what it says it does (how great am I at naming things). Depending on whether we want a signing key or a validation key, we get the the serialised RSA key from Redis, deserialise it and then convert it from the RsaKey DTO into the parameters that we originally extracted from the RSA. Then we use that to construct an RsaSecurityKey to use for signing or validating.
Most importantly for later, we also set the KeyId to the kid. When we use this RsaSecurityKey to sign a JWT, the CreateToken function on the JwtSecurityTokenHandler will put the kid into the header of the JWT. I'll create a JWT like this and paste it into jwt.io to show you what it looks like:
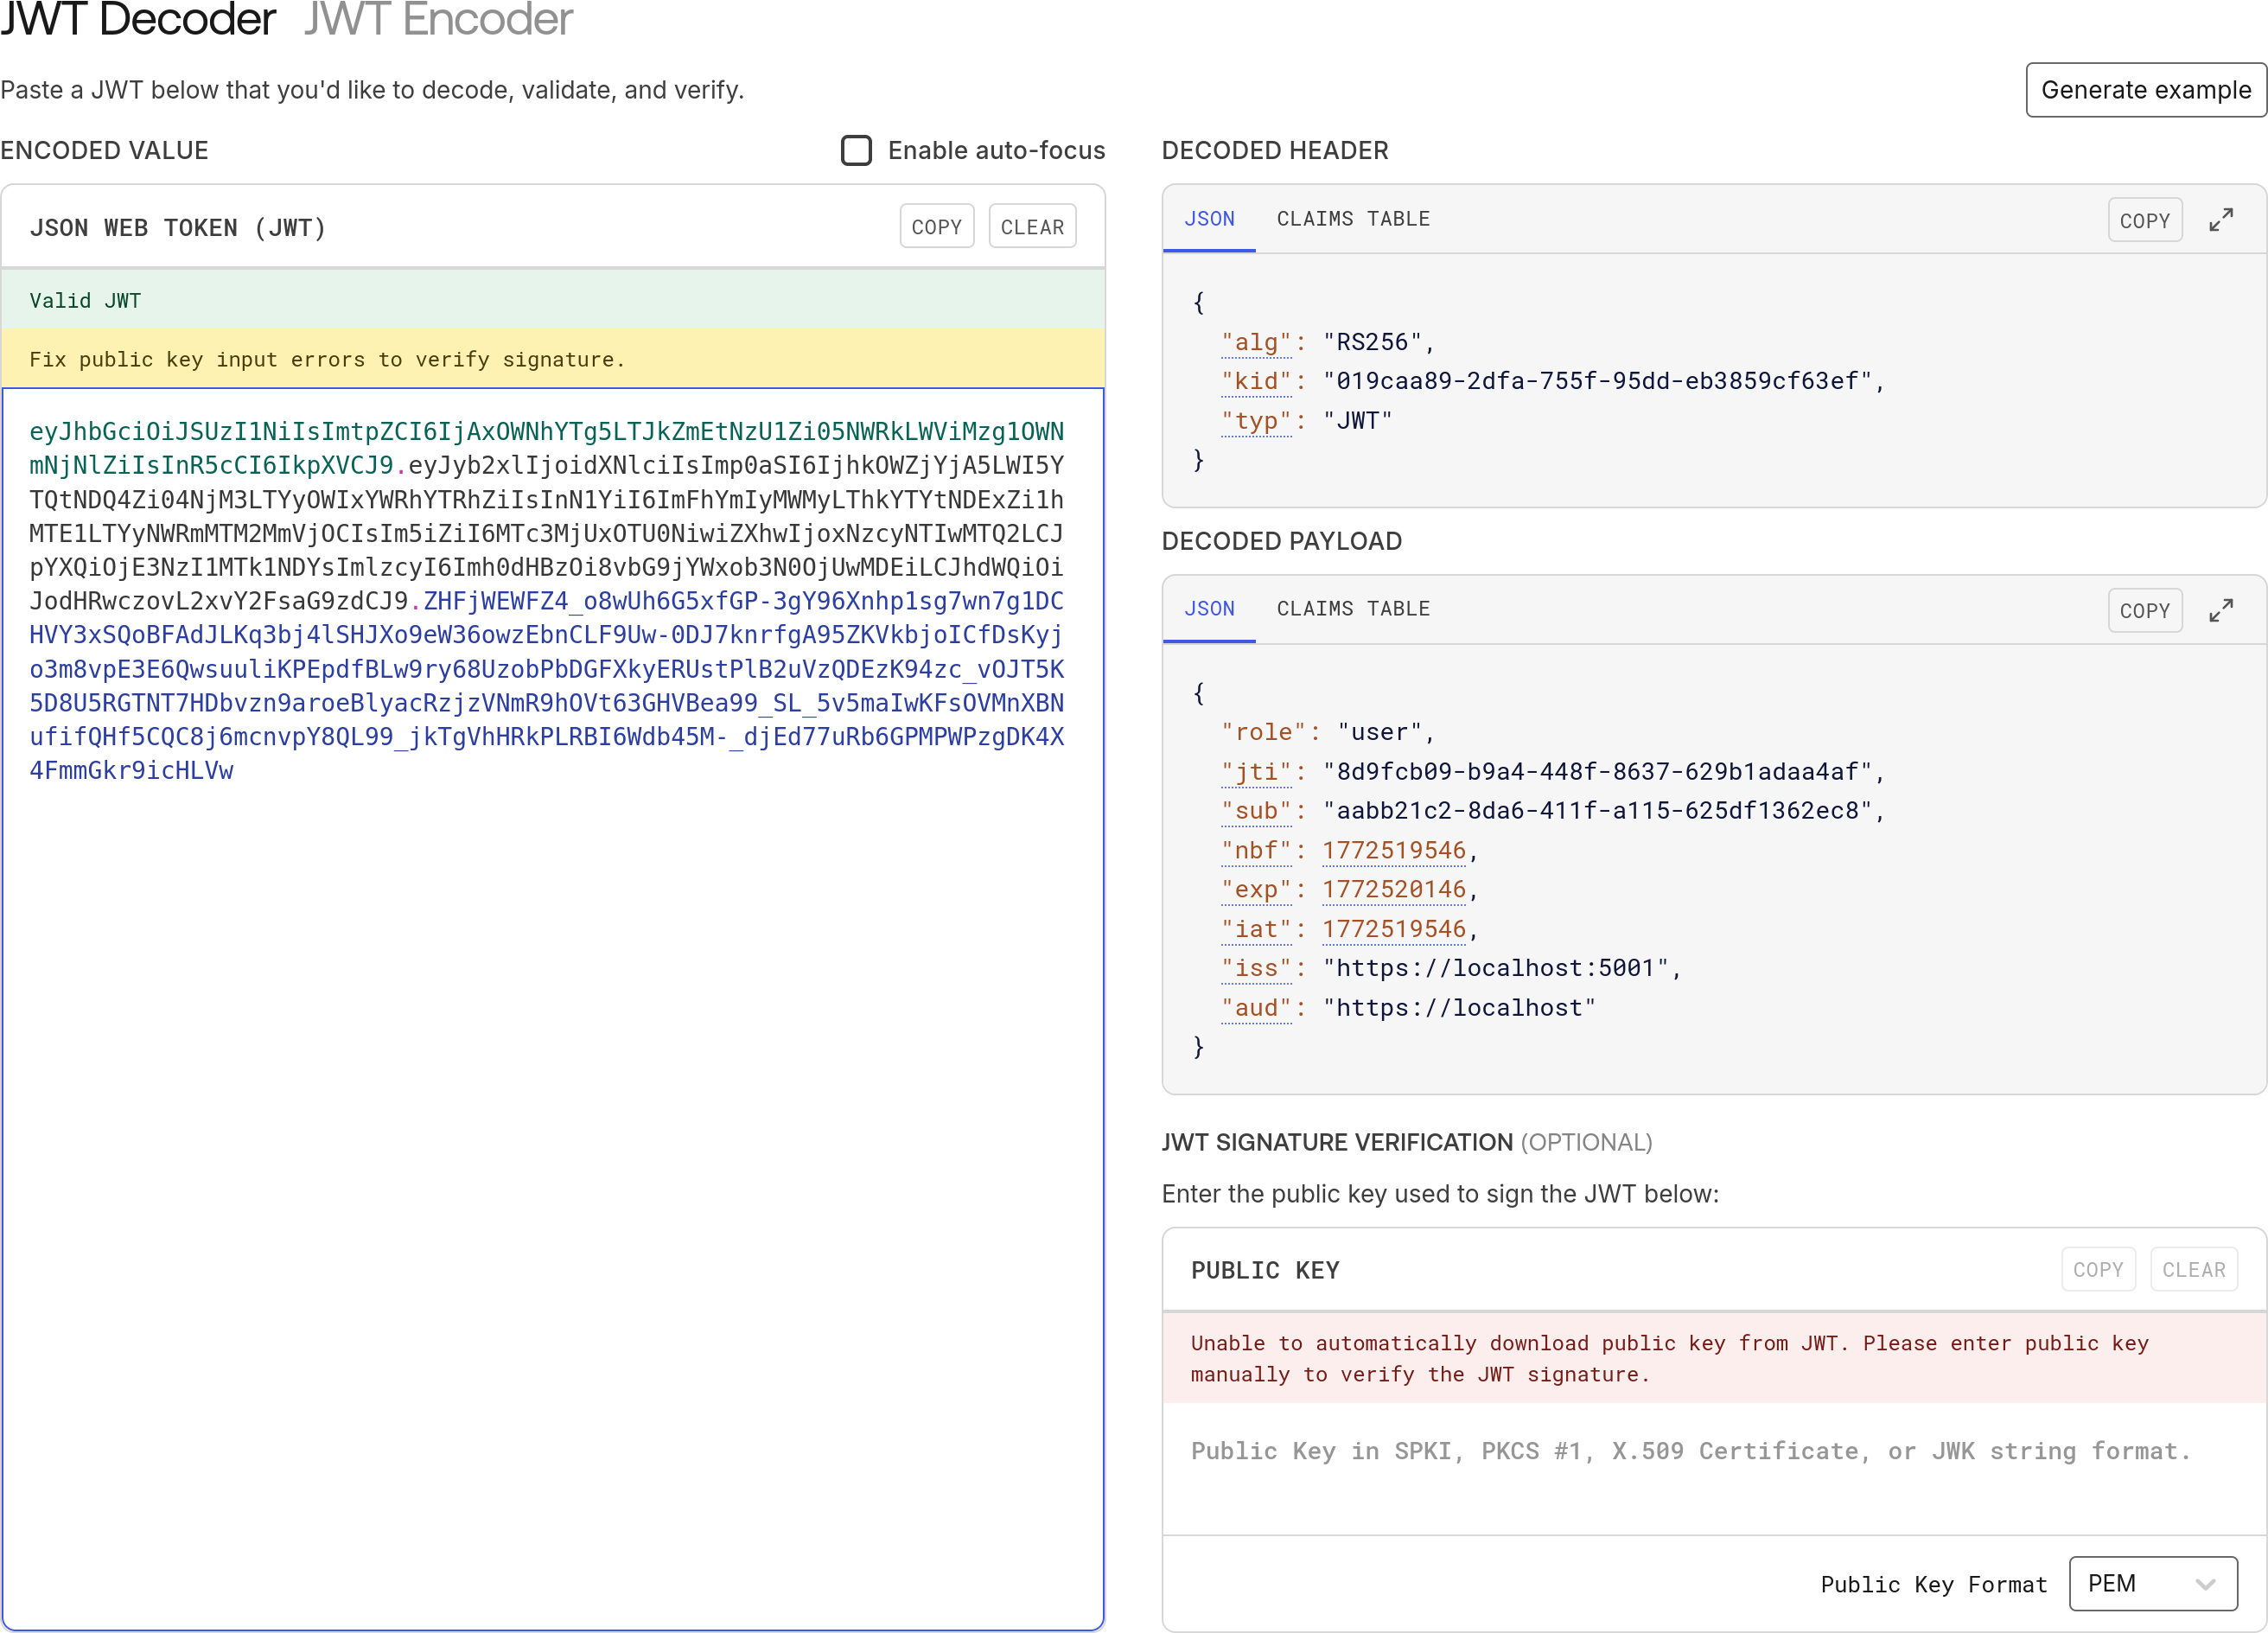
You can see, everything we want is in there. The kid in the header, the jti in the payload. The sub and the role of the user. This is what a well-designed JWT looks like.
Anyway, the reason it's important to make sure the kid is in the header is because when you try to access a protected endpoint on an API and the middleware is checking the /.well-known/jwks.json endpoint, it will compare the kid in your JWT against each kid in the JWKS and select the one that matches and then use the public key from that JWK to validate your JWT. It's a nicely refined process.
Alright, back to the last few functions in the JwksKeyManager. The main thing in GetAllPublicKeysAsync that isn't just creating a JsonWebKey is all this dead stuff:
public async Task<JsonWebKeySet> GetAllPublicKeysAsync()
{
    var kids = await GetKeyHistoryAsync();
    ...
    var dead = new List<string>();
    foreach (var kid in kids)
    {
        var key = await LoadKeyAsync(kid, false);
        if (key is null)
        {
            dead.Add(kid);
            continue;
        }
        ...
    }
    if (dead.Count > 0) await PruneDeadKidsAsync(kids, dead);
    return jwks;
}
What is happening here is that we get all the kids of the security keys that we've created (with GetKeyHistoryAsync) and loop around getting them one-by-one (with LoadKeyAsync) but if we don't get one, there's going to be two reasons why:
- We revoked the security key (more on that below).
- The security key expired.
If the security key reached its expiry date, Redis will have deleted it automatically, so we can't load it anymore, however the kid that identifies it is still stored in Redis, so we need to prune it out. That's what PruneDeadKidsAsync does:
private async Task PruneDeadKidsAsync(List<string> kids, List<string> dead)
{
    var history = kids.Except(dead).ToList();
    var json = JsonSerializer.Serialize(history);
    await cache.SetStringAsync(RedisKeys.KeyHistory(), json, _publicKeyOptions);
}
It takes the dead kids out of the list and then re-saves the list without them. It keeps things nice and tidy, otherwise we'd have an ever-growing list of kids and they would just take up unnecessary space.
There are two more functions to show in the JwksKeyManager. The first of which is to do with revoking keys.
In the second section of this article, entitled "Why key rotation matters", I told you why we're doing all of this. It's to do with security. We're trying to mitigate against malicious attacks on our system to keep it secure. You have to work on a zero-trust policy and don't ever assume that you have a total 100% secure system.
Sometimes breaches in security can come from inside your organisation, whether maliciously or via social-engineering. So it is possible that the private keys you use to sign your JWT's become compromised.
That means bad actors can just create valid JWT's and access your resources for as long as they like. In that case, it's no good just blacklisting individual tokens. You have to blacklist the security key that creates those tokens. Why is why we have to have this function:
public async Task RevokeKeyAsync(string kid)
{
    await cache.RemoveAsync(RedisKeys.PrivateKey(kid));
    await cache.RemoveAsync(RedisKeys.PublicKey(kid));
    var history = await GetKeyHistoryAsync();
    history.Remove(kid);
    var json = JsonSerializer.Serialize(history);
    await cache.SetStringAsync(RedisKeys.KeyHistory(), json, _publicKeyOptions);
    var currentKid = await cache.GetStringAsync(RedisKeys.CurrentKid());
    if (currentKid == kid) await cache.RemoveAsync(RedisKeys.CurrentKid());
}
Assume we know which kid is compromised. We pass that through to the function and it removes both the public and private versions of the security key from Redis. Then we remove the kid from the history and if the compromised kid is also the key for the security token that's currently in use, we reset the current kid too.
Alright, that brings us to the last function in the JwksKeyManager and this one actually has the most impact:
public async Task<RsaSecurityKey> GetOrCreateSigningKeyAsync()
{
    var currentKid = await cache.GetStringAsync(RedisKeys.CurrentKid());
    if (string.IsNullOrEmpty(currentKid)) return await RotateSigningKeyAsync();
    var signingKey = await LoadKeyAsync(currentKid, true);
    if (signingKey is not null) return signingKey;
    return await RotateSigningKeyAsync();
}
First we try to get the kid for the currently active security key. If it doesn't exist, it's either:
- Because we haven't created any security keys yet.
- We revoked the previously current security key.
Either way, if there's no current kid, we call RotateSigningKeyAsync which as we know, creates a new security key, adds the key and the new kid to Redis, and sets the kid to be current.
Otherwise, if there is a current key, we get it from Redis and send it back. If we can't, we just call RotateSigningKeyAsync to generate and return a new one.
And that's it! It's basically just CRUD work, but with a bit of magic from Redis to auto-delete expired keys. That makes it possible to avoid having to do everything in a database and then having to also create a background service to expire keys and kids.
Next I'll show you where these functions are used.

Changes to the authentication API endpoints
In the /token and /refresh endpoints, we were injecting in the old RsaKeyProvider service and using that to get a signing key to pass to the token generator like this:
app.MapGet("/token", (RsaKeyProvider rsaKeyProvider, ...) =>
    {
        ...
        var accessToken = TokenGenerator.GenerateToken(
            rsaKeyProvider.SigningKey.Value, jti, userId, user.Role, now, config.Value.AccessTokenLifetime);
        ...
    })
   .AllowAnonymous();
Now we replace that with the JwksKeyManager:
app.MapGet("/token", async (JwksKeyManager keyManager, ...) =>
    {
        ...
        var signingKey = await keyManager.GetOrCreateSigningKeyAsync();
        var accessToken = TokenGenerator.GenerateToken(
            signingKey, jti, userId, user.Role, now, config.Value.AccessTokenLifetime);
        ...
    })
   .AllowAnonymous();
The /.well-known/jwks.json endpoint becomes much more simplified:
app.MapGet("/.well-known/jwks.json", async (JwksKeyManager keyManager) =>
    {
        var jwks = await keyManager.GetAllPublicKeysAsync();
        return Results.Json(jwks);
    })
   .WithName("JWKS")
   .AllowAnonymous();
And we add the endpoints to revoke and rotate keys:
app.MapPost("/rotate-key", async (JwksKeyManager keyManager) =>
    {
        var key = await keyManager.RotateSigningKeyAsync();
        return Results.Ok(new { Kid = key.KeyId, Message = "Key rotated successfully" });
    })
   .RequireAuthorization("admin");
app.MapPost("/revoke-key/{kid}", async (JwksKeyManager keyManager, string kid) =>
    {
        await keyManager.RevokeKeyAsync(kid);
        return Results.Ok(new { Message = $"Key {kid} has been revoked" });
    })
   .RequireAuthorization("admin");
Note that both of these endpoints require an authenticated user with an admin role.
And that's it. Although I've shown you a lot of code in this article, the main focus is really on why you want to rotate keys. How you do it is just an implementation detail.
As usual, I'll call the endpoints with Insomnia to show you the flow and the results we get.

Testing our new JWKS implementation
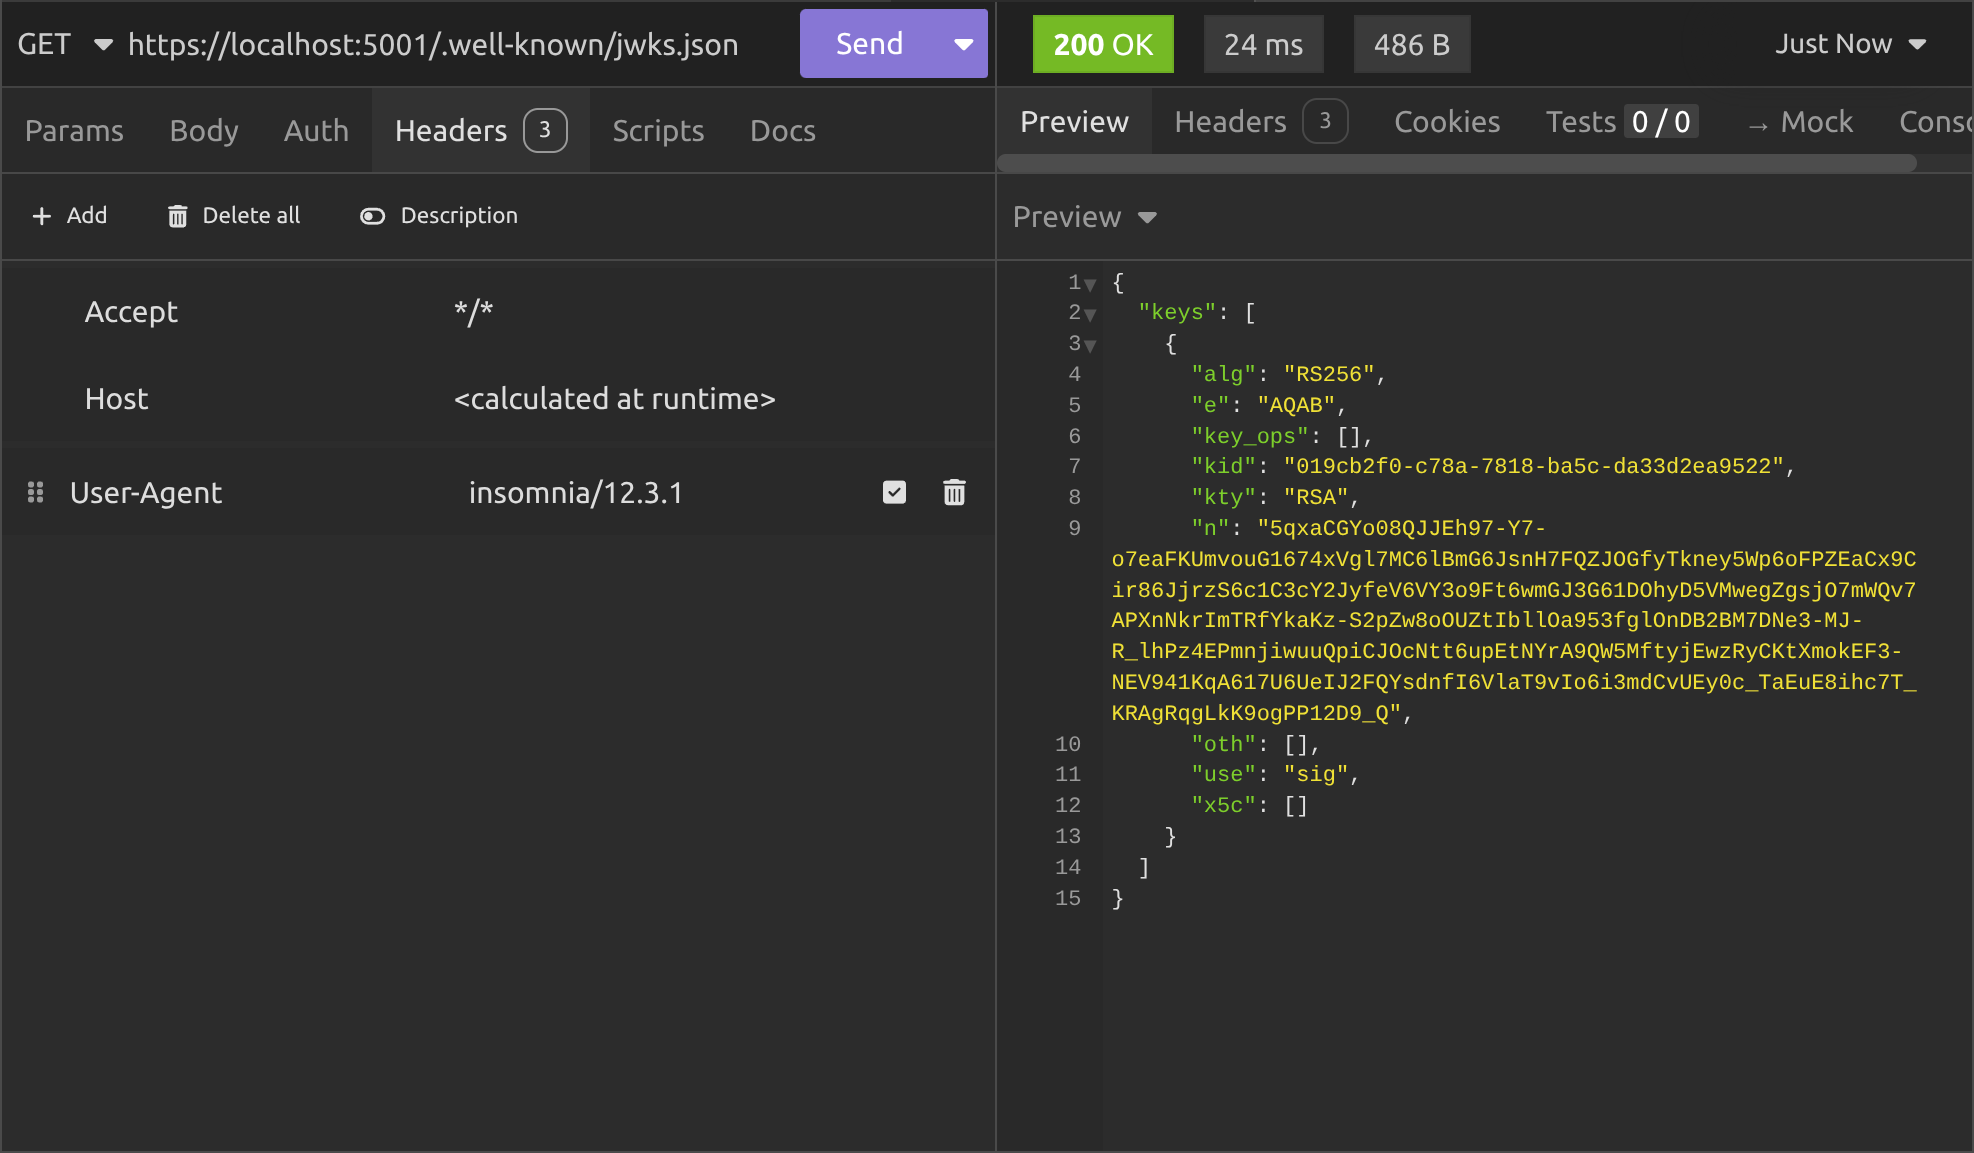
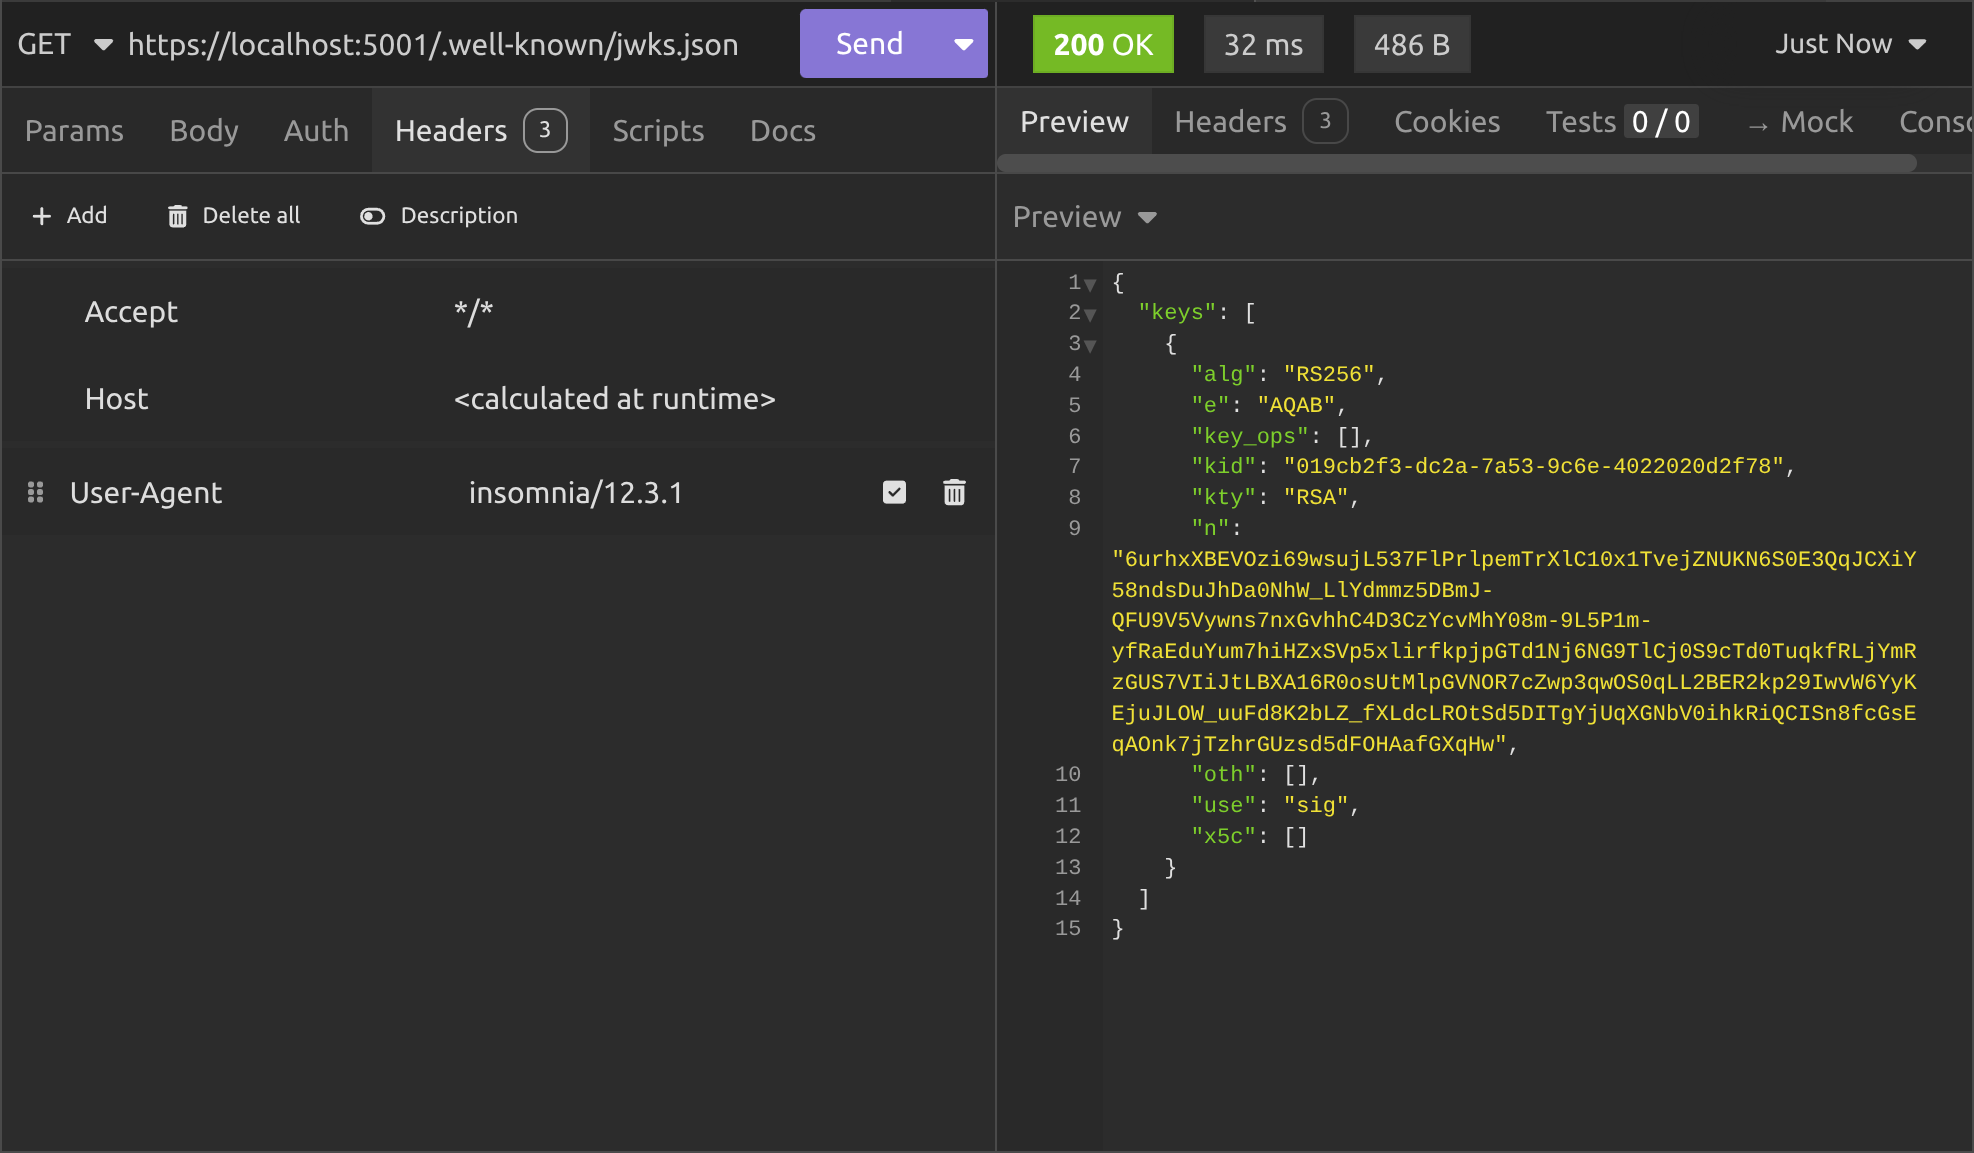
First we'll check the /.well-known/jwks.json endpoint to see what security keys are currently registered.
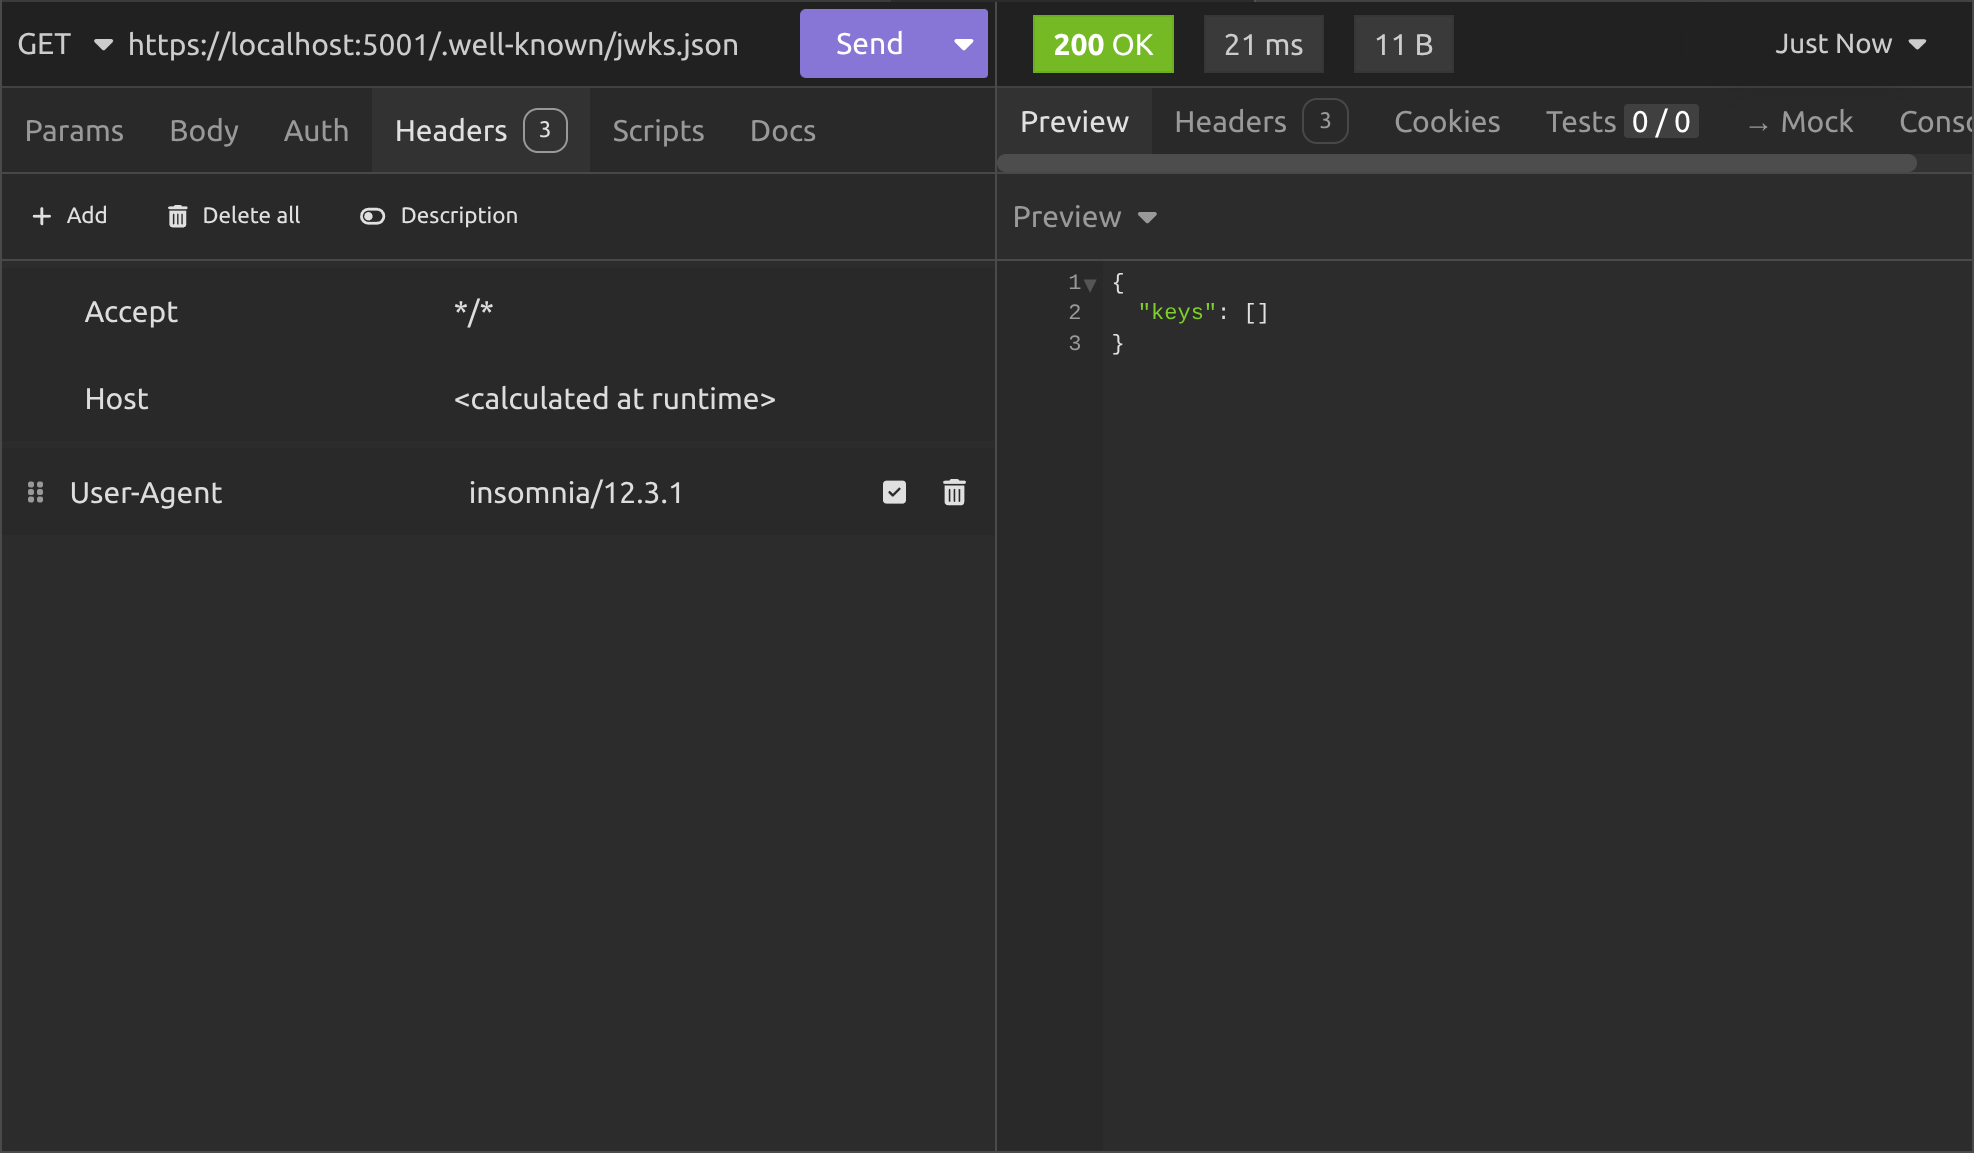
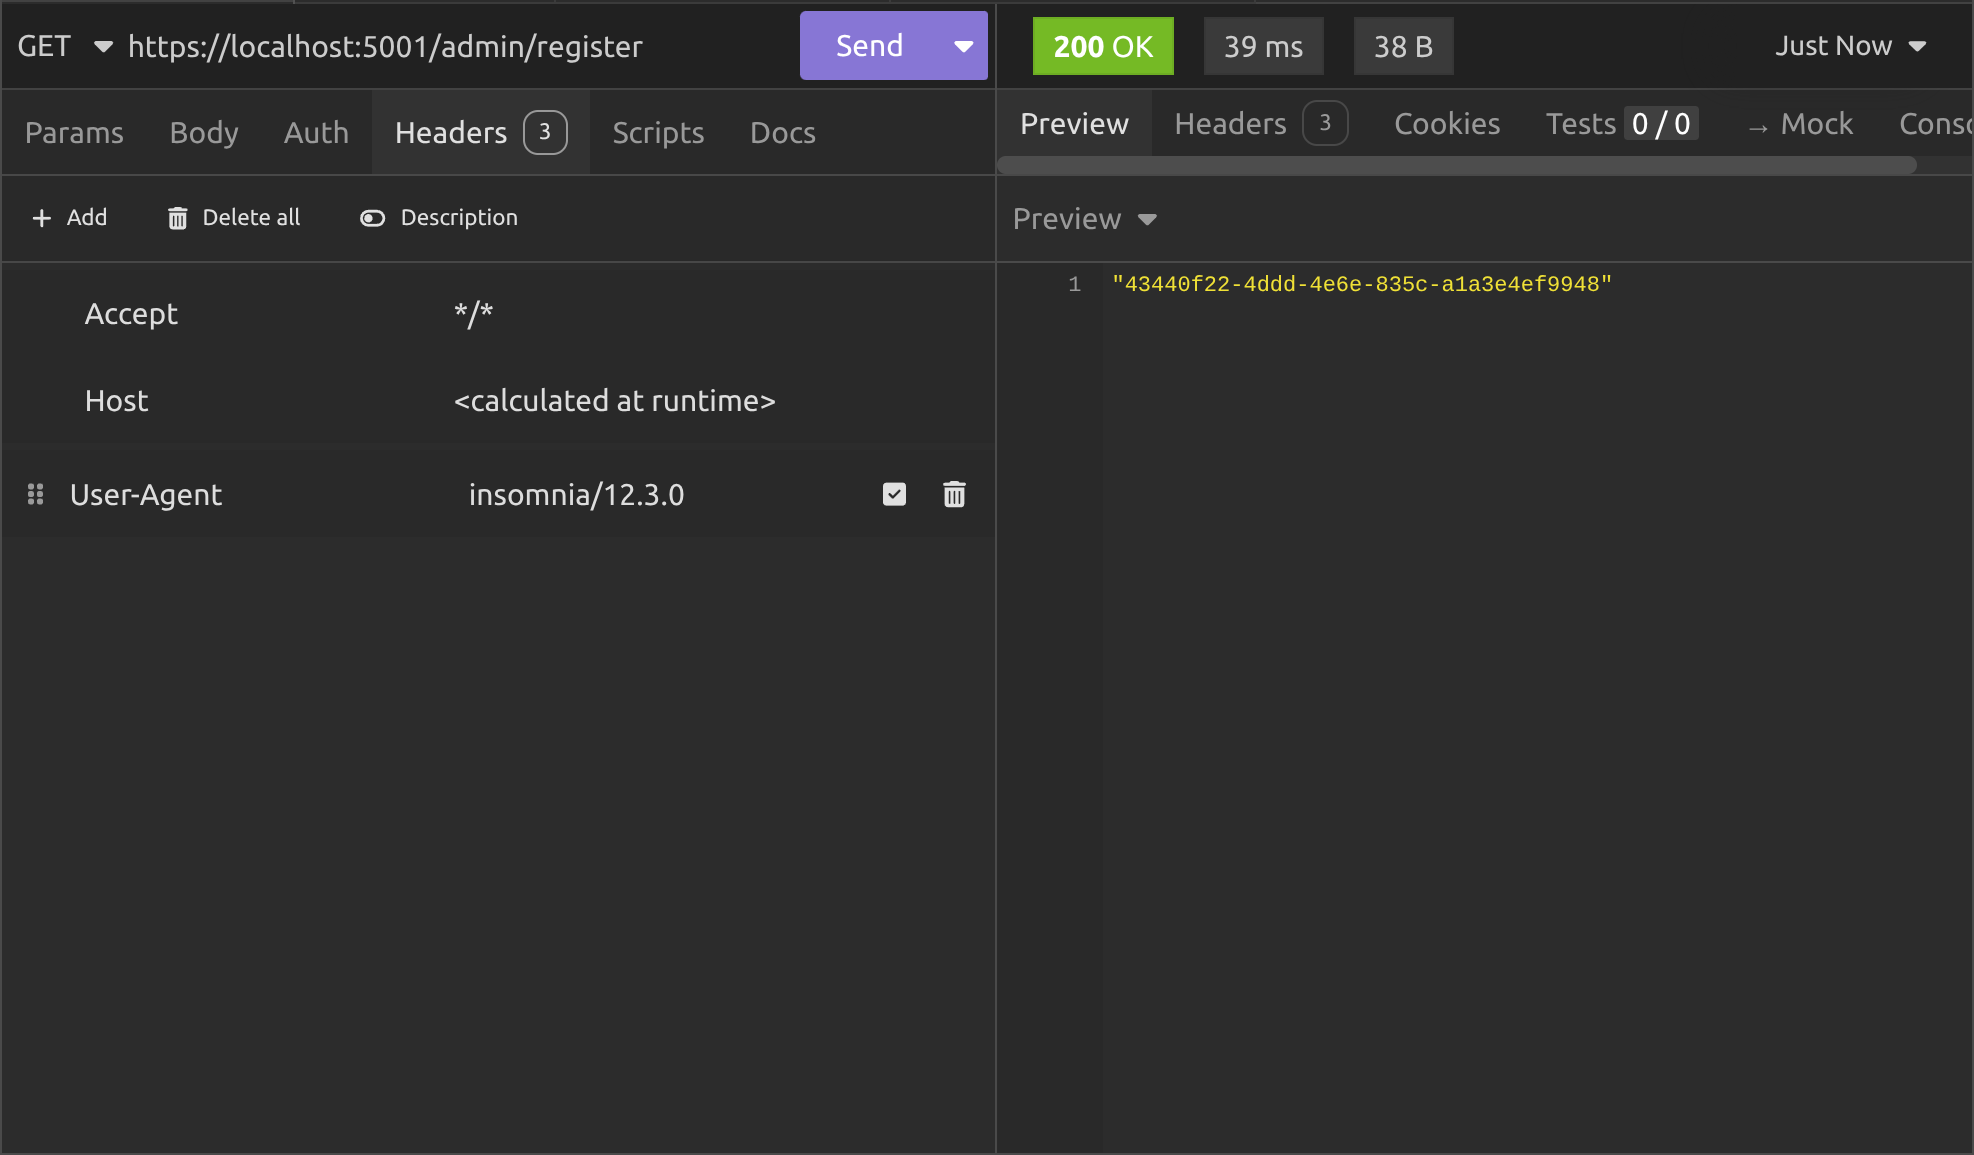
As you can see, we have none. Next we register the user. I'll register as an admin user to make things simple.
Then I'll grab a token for the user by grabbing the userId and pasting it in to the query string on the /token endpoint:
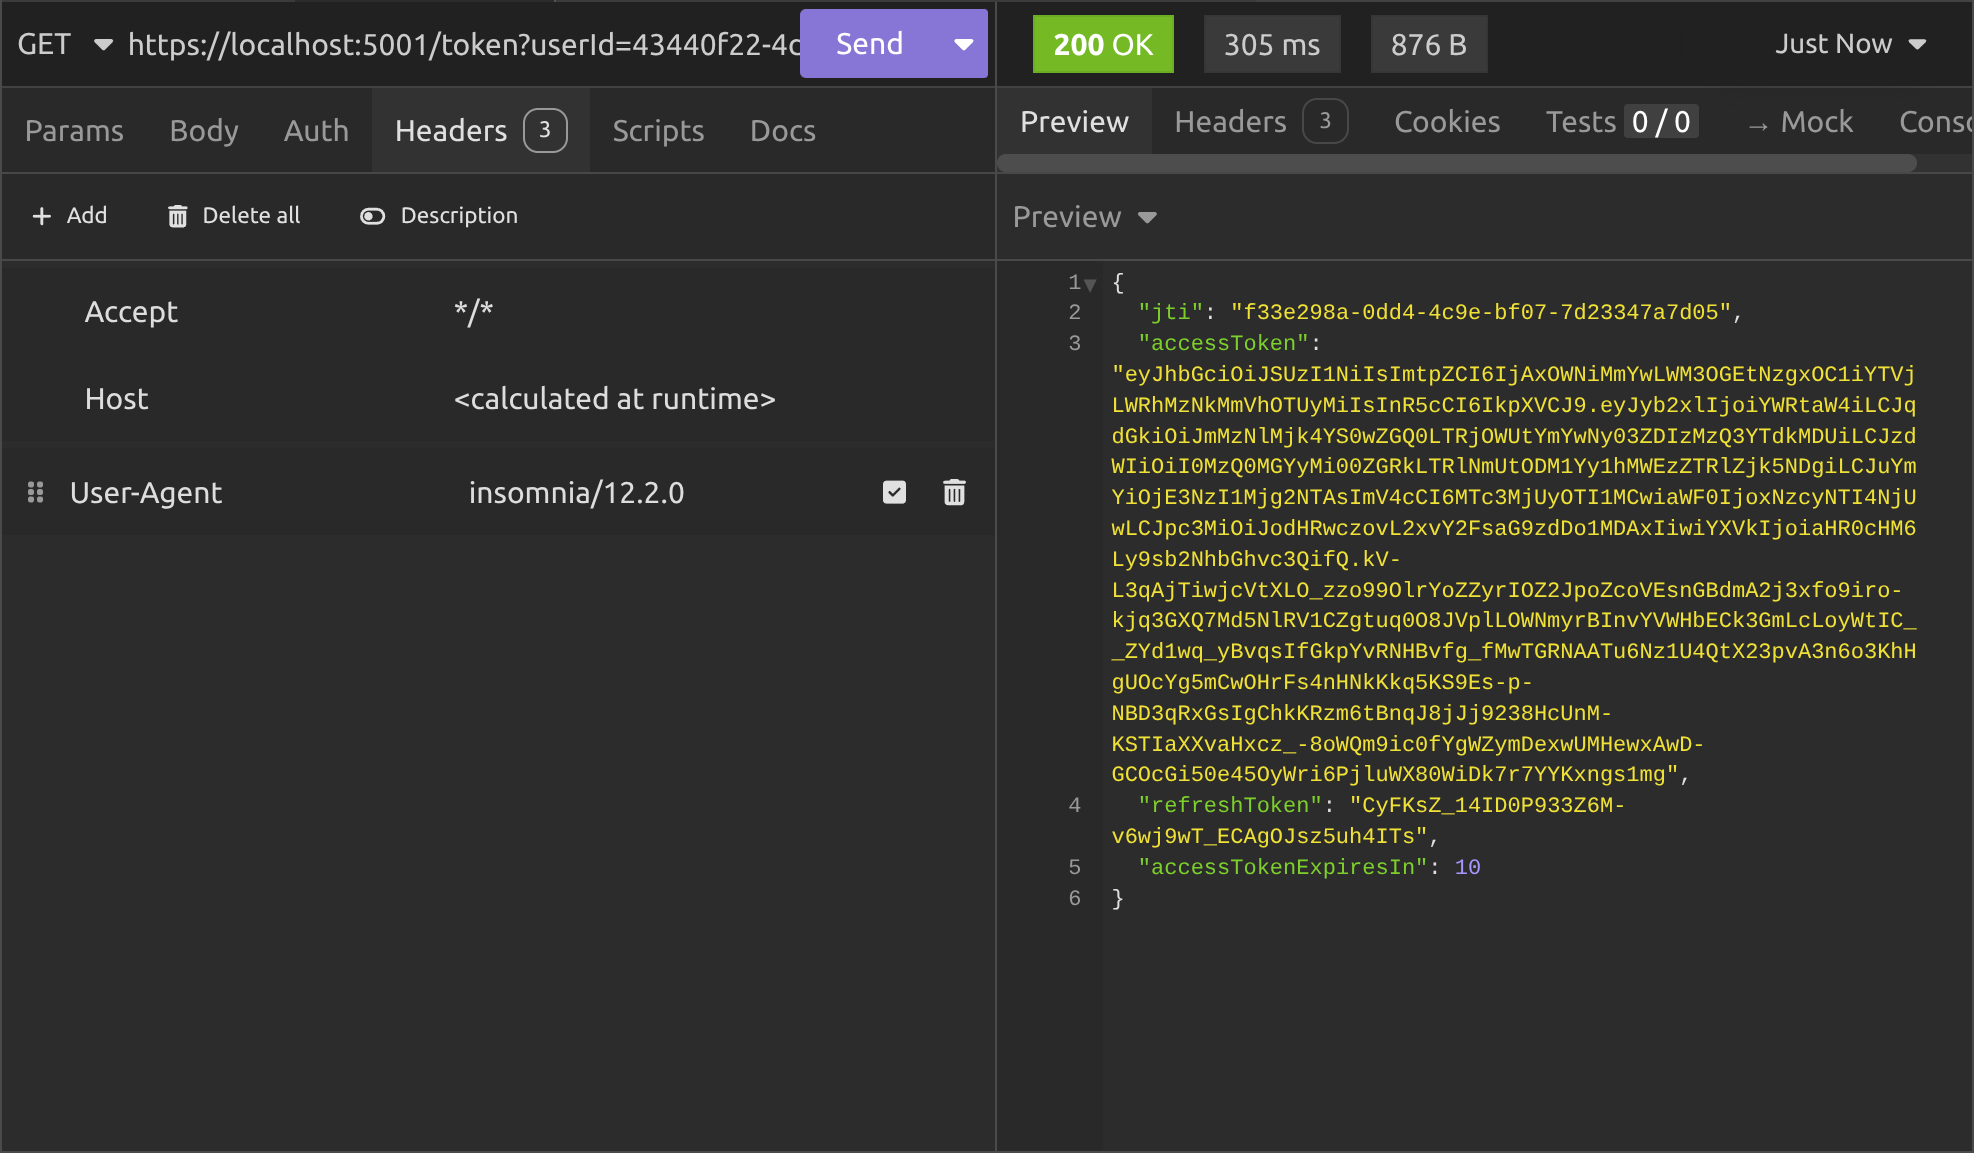
That gives us a JWT access token that we can use to access the protected endpoints on our API's, but in the background, it also creates a security token and stores it in Redis. Then we can check the /.well-known/jwks.json endpoint again to see it:
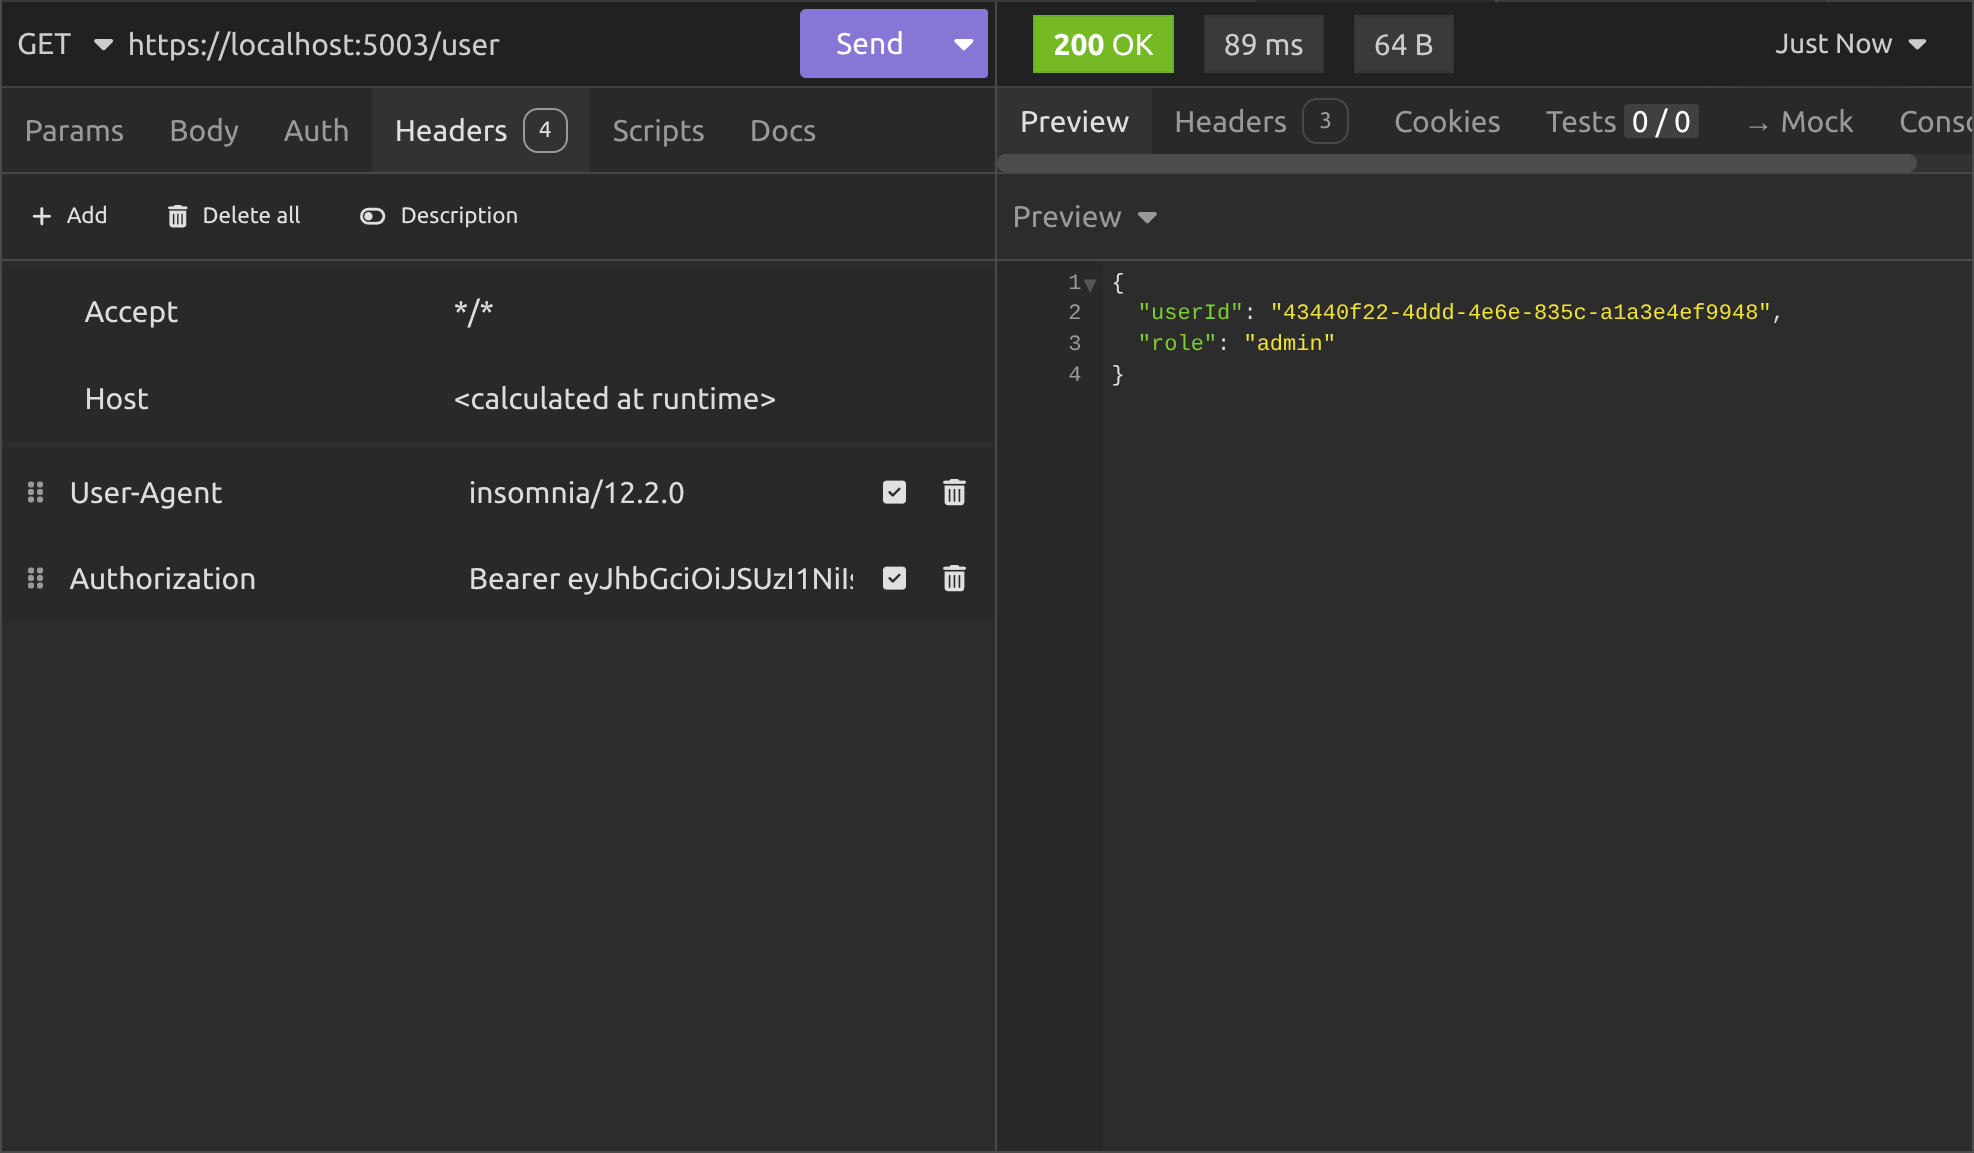
Alright so here's the moment of truth: We call the /user endpoint on a totally different API (the Other API) that's been set up to check the authentication API's JWKS. So I copy the JWT access code and paste it into the Bearer header as I've shown you in previous articles:
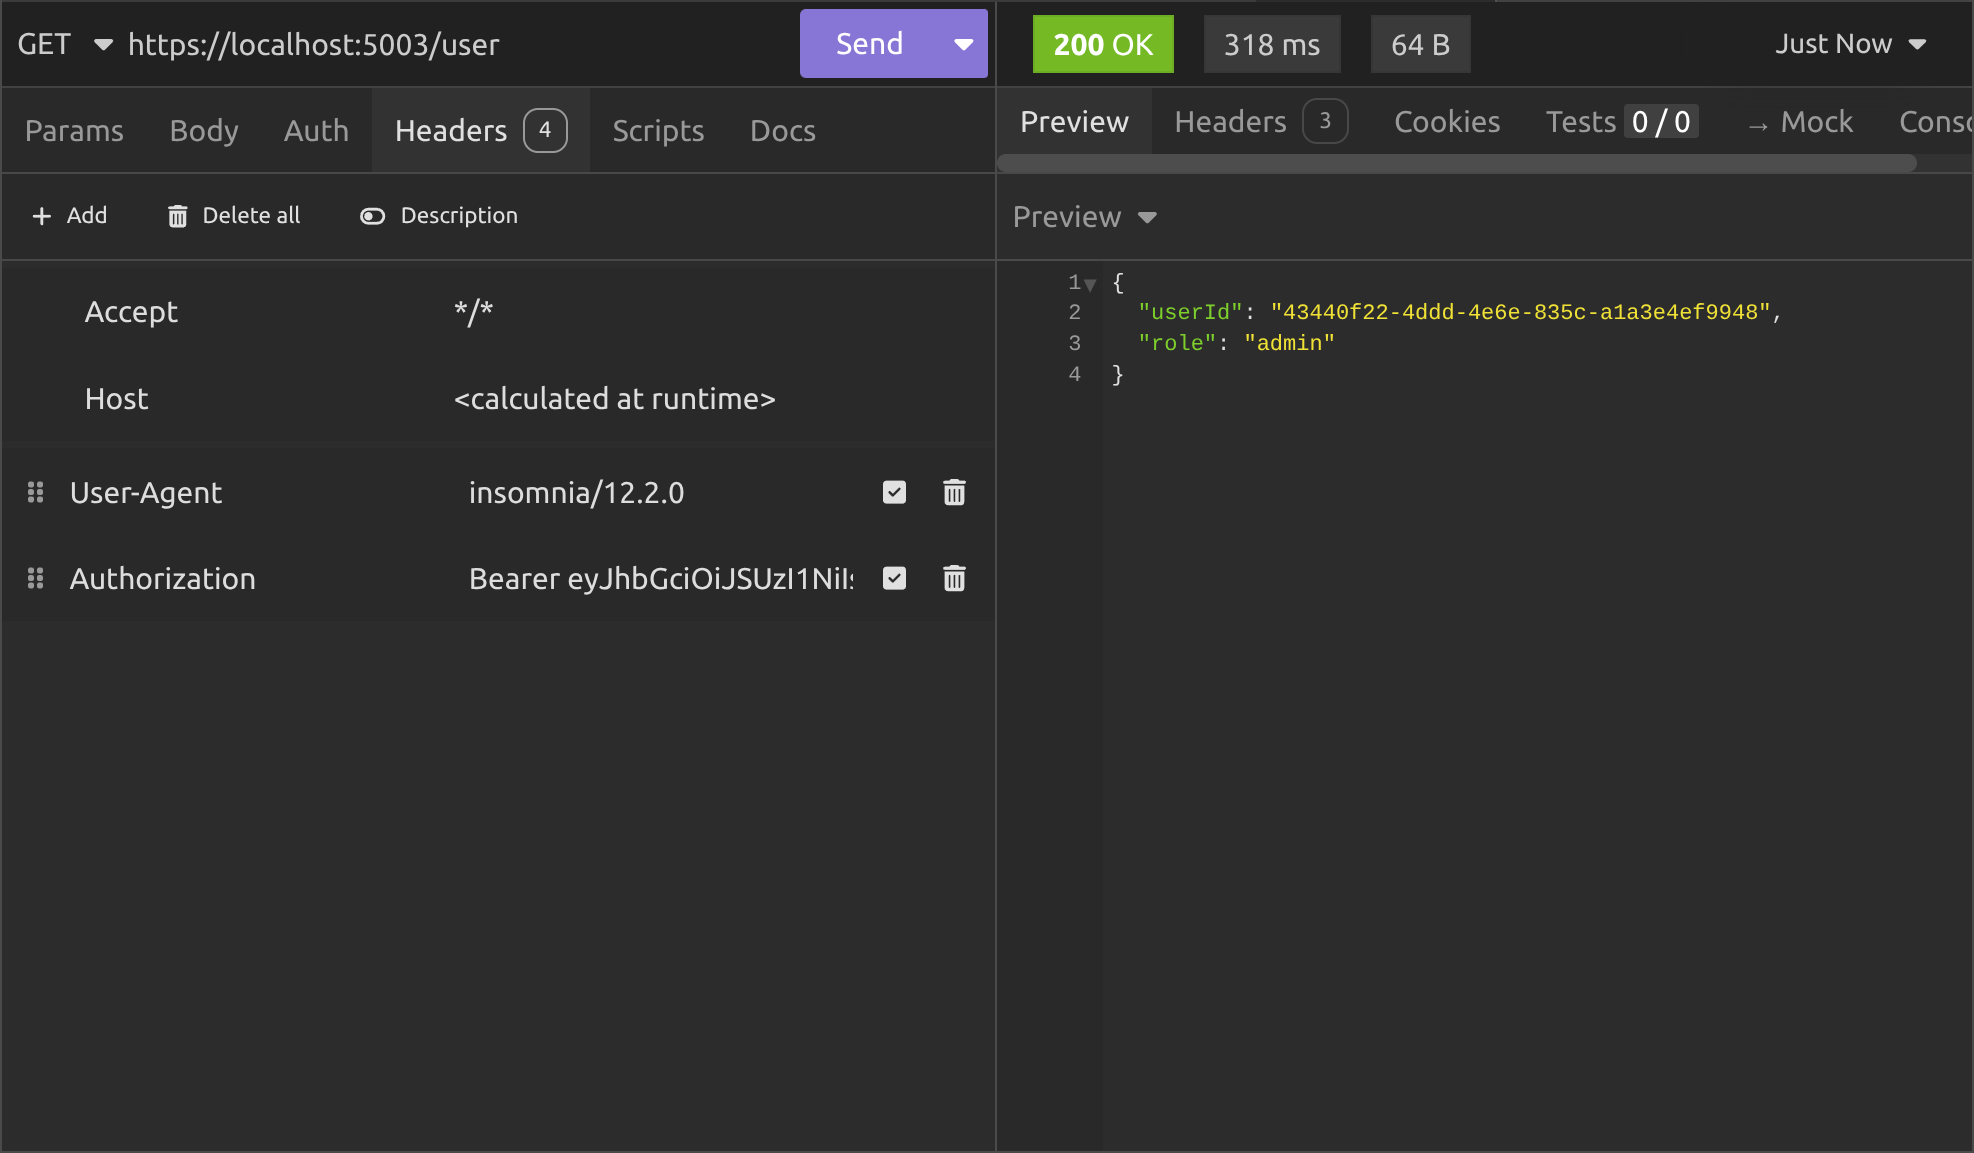
And it works! I explained the whole thing in the previous article, so I won't go into it here, but next we want to test the other functionality that we implemented.
I'll test rotating keys next. Normally that's done automatically, when you try to create a JWT using a security key that has either expired or been manually revoked. However, since we have the endpoint, we might as well try it and see what happens:
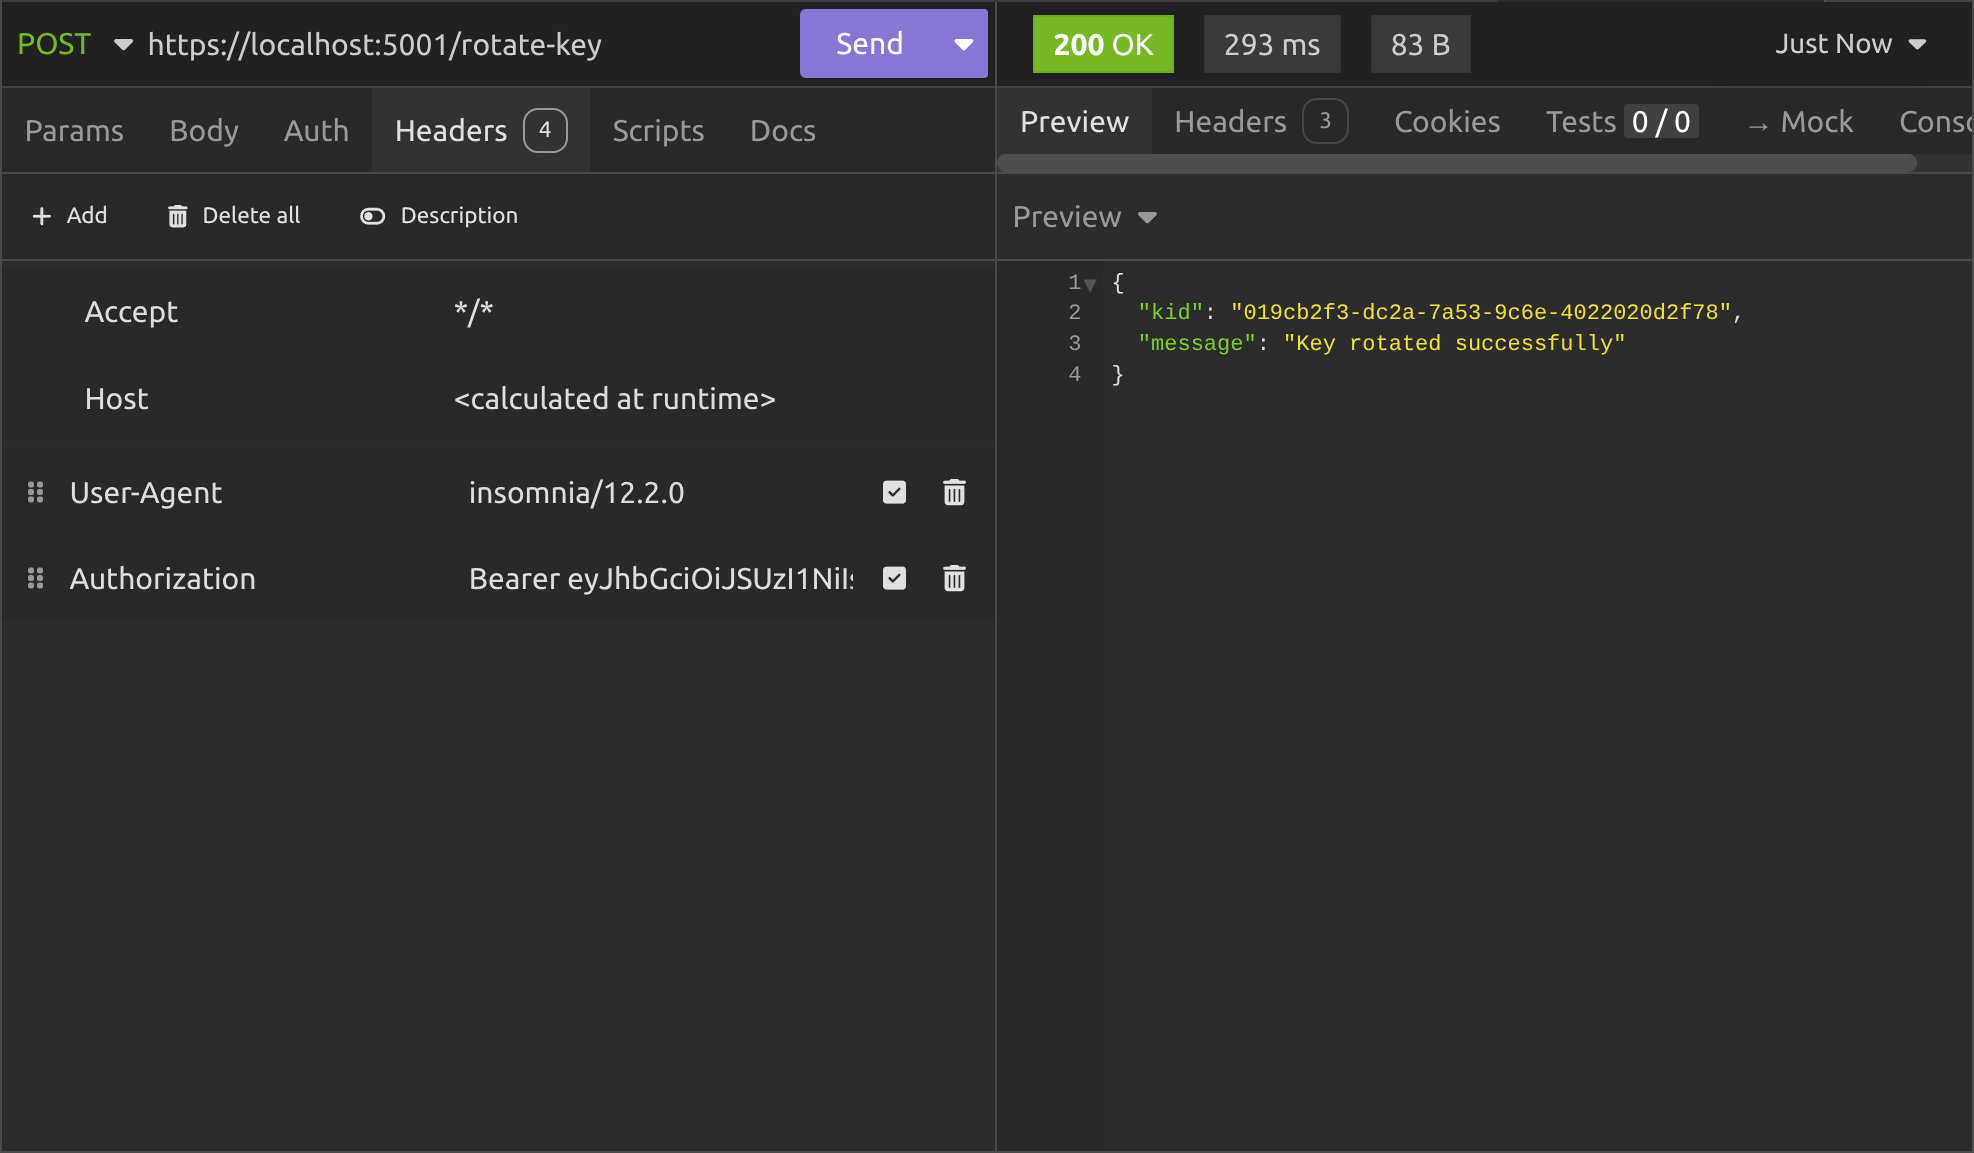
Okay it worked fine. In the background, it created a new security key, added it to public and private key lists on Redis, added the kid to the history and set the kid to be the current one. So let's see what's there when we call the /.well-known/jwks.json endpoint again:
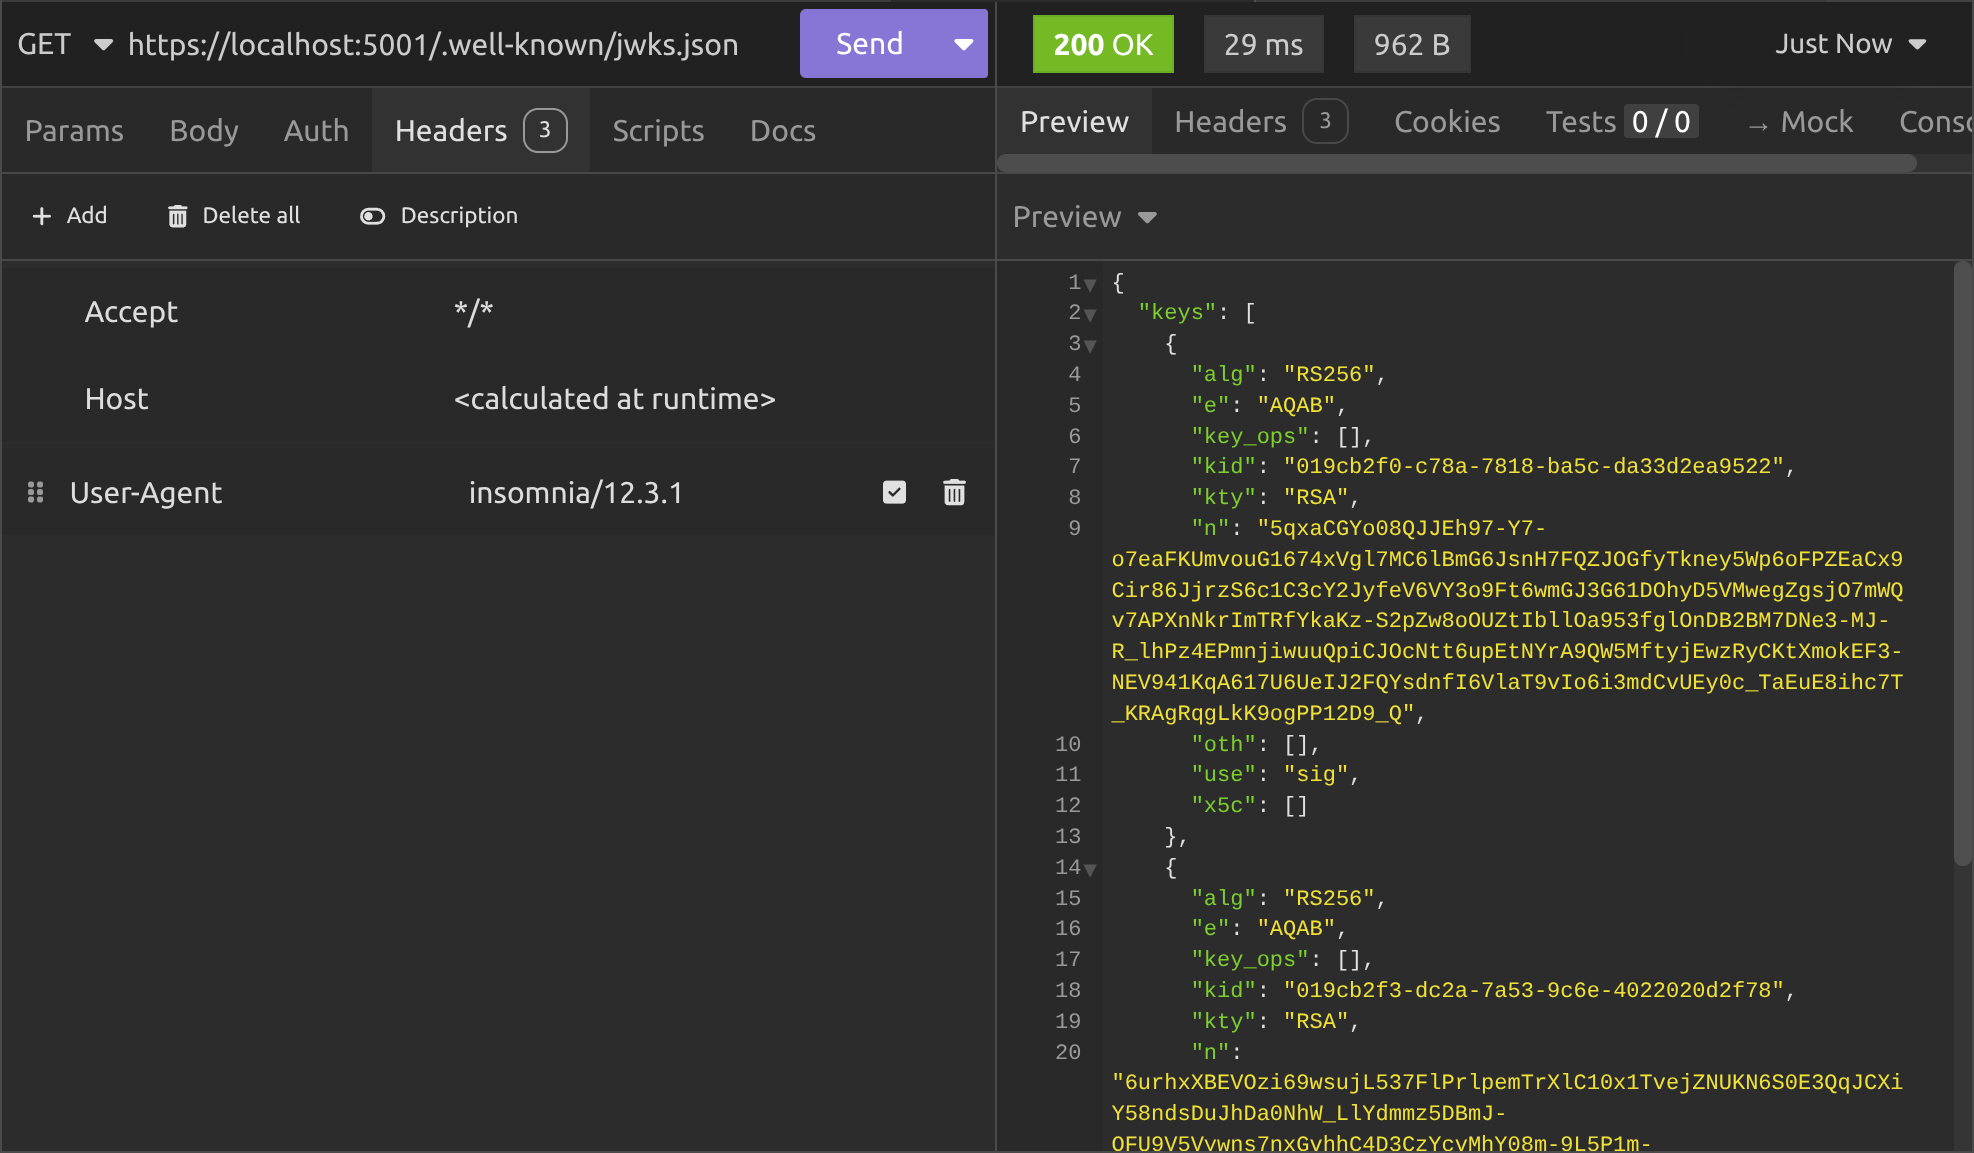
As you can see, we've now got two JWK's in our JWKS, which is exactly what we want. The current security key is the one with the kid that ends with 2f78. So let's try accessing the /user endpoint again using the JWT signed with the old security key:
It still works, because the public key for the security key that signed our original JWT is still in the JWKS list.
The middleware has grabbed the kid out of the header in the JWT and looked in the JWKS for a JWK with a matching kid. When it found it, it used the public key to validate the JWT.
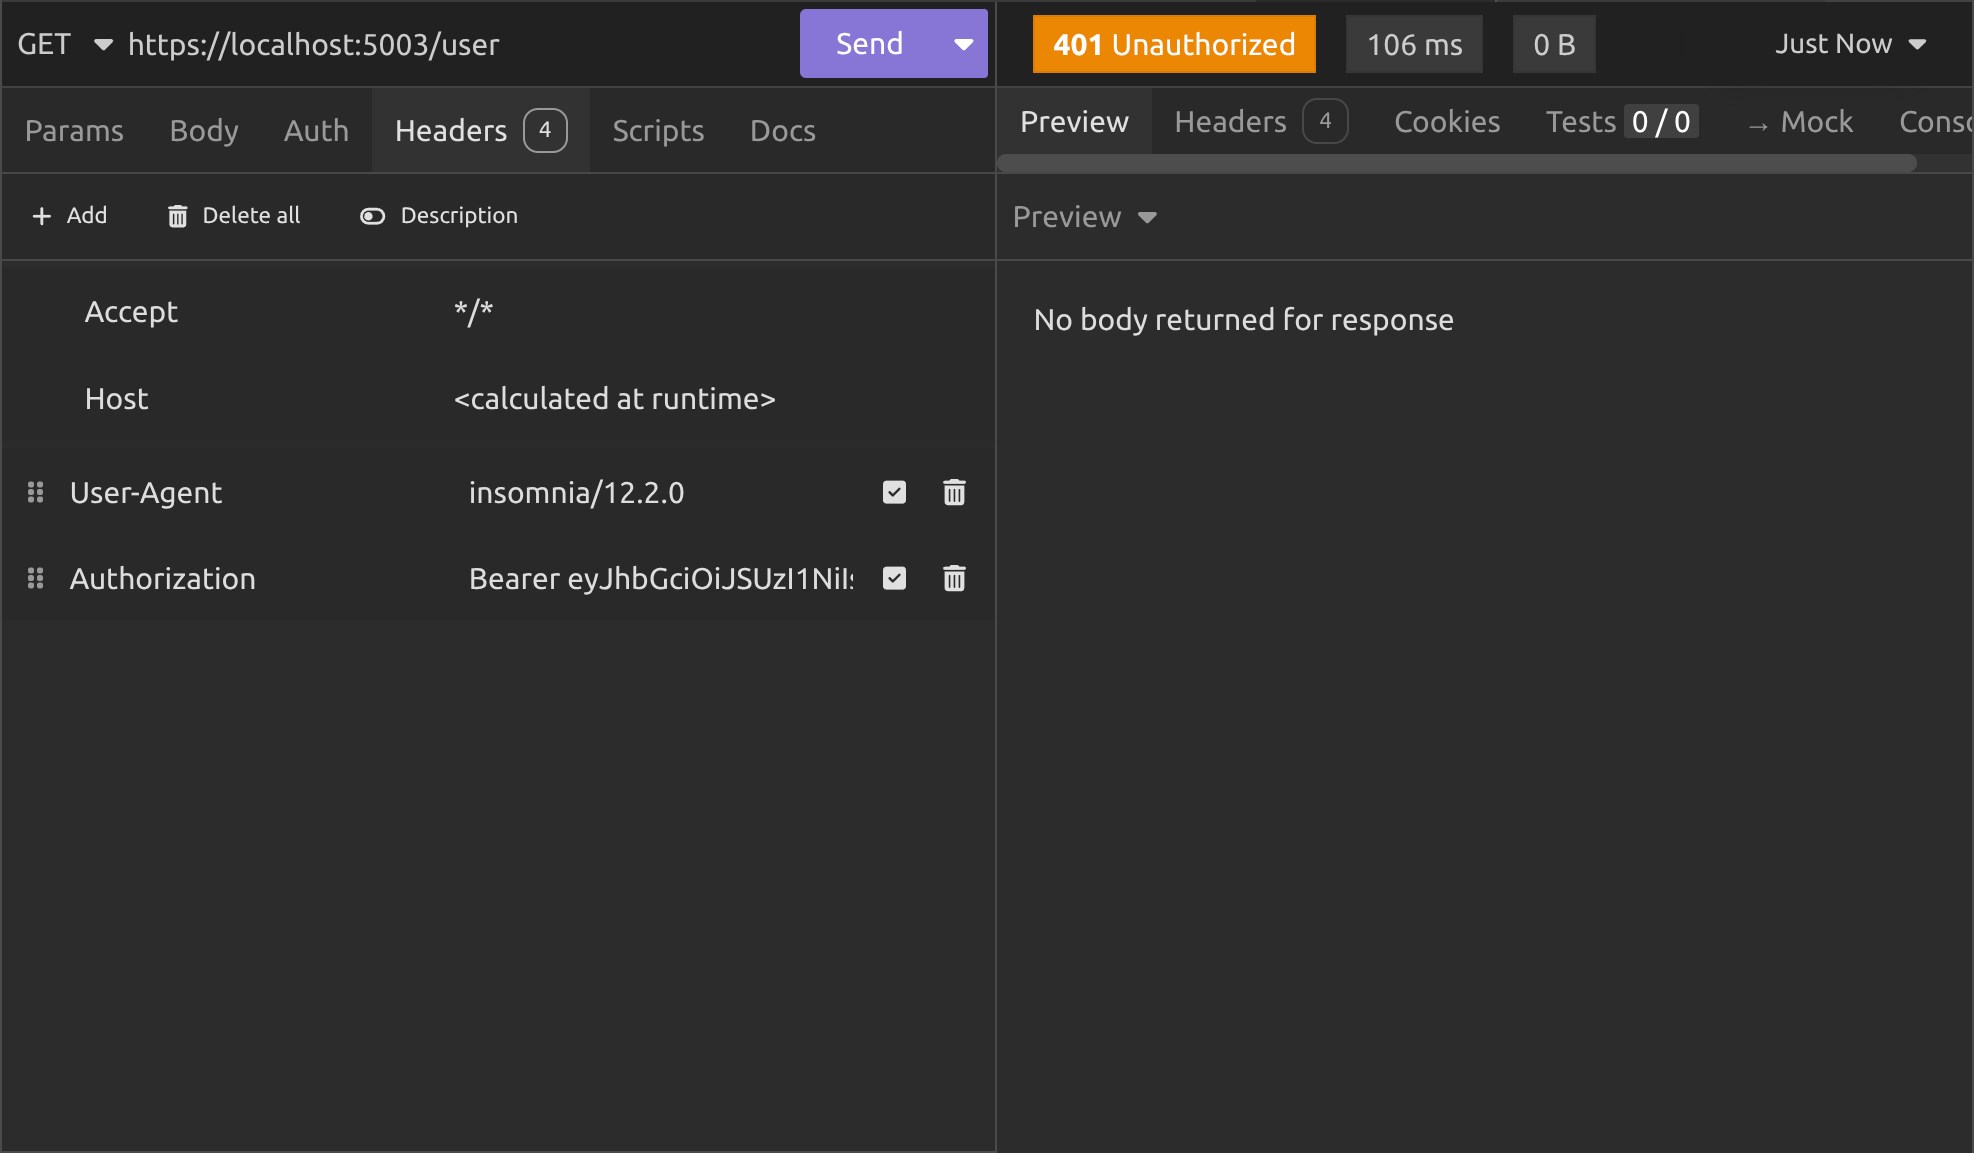
Okay, let's try revoking the first security key:

All good. Now let's see what the /.well-known/jwks.json endpoint gives us:
Perfect, so the original security key is gone and now we only see the JWK for the second security key we created.
That means if we try to access the /user endpoint again, this time we'll get a 401 Unauthorized response, right?

But we don't! We get a 200 OK response.
Why? Didn't we implement JWKS properly?
Well actually, we did implement it properly, but we got caught by a gotcha.
As I said in the previous article; in .NET, API's that use the well-known service discovery endpoints specified in the OIDC specification cache the JWKS internally. They do that so they're not making background HTTP calls every time an authentication request happens.
So, even though we revoked the security key, it's going to keep on using the public key from its cached JWK to validate any JWT passed to it until that cache expires.
By default, the cache expires after five minutes, so if we wait five minutes and try the /user endpoint again, we'll get what we expect:
What do we do about the API caching the JWT then?
Well it depends what balance we want between security and speed.
If you care more about speed, you can just leave it at the default values, but if you want to make sure the cache expires quicker, you can configure it like this:
builder.Services.AddAuthentication(JwtBearerDefaults.AuthenticationScheme)
       .AddJwtBearer(options =>
        {
            options.RefreshInterval          = TimeSpan.FromMinutes(1);
            options.AutomaticRefreshInterval = TimeSpan.FromMinutes(1);
        });
Conclusion
We now have a complete, production-ready JWT key rotation system.
We used Redis to give us automatic expiry-based key rotation every 90 days with zero background jobs or cron tasks. We kept old public keys alive for 365 days, so tokens signed with previous keys continue to validate without any interruption.
We made sure everything survives application restarts and deployments. And when something does go wrong, we added a simple admin endpoint to instantly revoke a compromised key.
The whole solution is only a few hundred lines of clean, focused code, yet it follows real-world security practices and compliance expectations. You can now safely rotate signing keys on a schedule (or on demand) while keeping your APIs working for every legitimate user.
Key takeaways
- A single static signing key is a security and compliance risk. Rotate keys regularly to limit exposure.
- Redis expiry is the secret sauce: Set different lifetimes for private keys (rotation trigger) and public keys (grace period for old tokens).
- Store a small history list of
kidsso the/.well-known/jwks.jsonendpoint can always serve every public key that might still be in use. - Always set
KeyId = kidon yourRsaSecurityKey. The JWT handler automatically puts it in the token header and the resource server uses it to pick the right public key. - Revocation is separate from rotation: Rotation adds new keys, revocation instantly removes a compromised one (and you need both).
- The resource server caches the JWKS. Shorten the refresh interval or combine key revocation with JTI blacklisting for instant effect when needed.
- The whole system is lightweight, survives restarts, and requires no extra infrastructure: Exactly what you want in a real production auth server.
In the next article I'll be covering common JWT attacks and how to block them in ASP.NET. I hope you'll join me as we continue our journey through JWT authentication in .NET!
Enjoyed this hands-on deep dive?
Subscribe (for free) for the full series. Code-heavy guides straight to your inbox.
Questions or your own JWT experiments?
Comment below or connect on LinkedIn / X. Let's master secure .NET APIs together.