Directions for Turning Rough Rocks into Beautiful Tumbled Stones
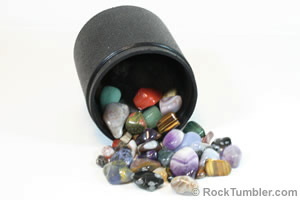
Working to transform rough rock into beautiful tumbled stones gives most people a great feeling of accomplishment. It doesn't matter how old you are or how many batches of rock you have tumbled in the past - when you finish the last tumbling step, rinse off the polish, and see a super-bright luster on colorful polished stones - you are amazed at what you have done.
Rock Tumbling Is Easy
Using a rock tumbler to convert rough rock into sparkling tumbled stones is easy if you follow a simple procedure and observe a few rules. We are writing this to share the procedure that we have used for many years with a number of rotary tumblers.
This procedure works well with materials that have the following properties:
- of adequate quality to accept a polish
- a Mohs hardness between 6 and 7
- a size between 3/8" and 1 1/2"
Chalcedony
: agate, bloodstone, carnelian, chrysoprase, jasper, chert, flint, and petrified (silicified) wood.Quartz
: amethyst, aventurine, citrine, milky quartz, rock crystal, rose quartz, smoky quartz, tiger's-eye.Rock Types
: andesite, basalt, diorite, gabbro, granite, mookaite, novaculite, quartzite, unakite.The "Golden Rules" of Rock Tumbling
We follow three "Golden Rules" in all aspects of rock tumbling. They are:
- "Garbage in means garbage out"
- "Avoid contamination"
- "Great results take time."
"Garbage in Means Garbage Out"
If you start with garbage (low-quality rough), you should expect low-quality tumbled stones. So, don't hesitate to discard a rock that is porous, fractured, misshapen, or that is not expected to produce an attractive tumbled stone.
You will spend a lot of time and valuable supplies tumbling a batch of rocks. Using quality rough saves time, gives you better value for your money, and produces tumbled stones that are of much higher quality.
We buy lots of tumbling rough from online vendors as part of our hobby and to educate ourselves. We have the best experience buying rough from vendors who: 1) provide clear written descriptions and large clear photos of the rough they are selling, 2) show photos of tumbled stones that they produced themselves from the rock they are selling, and, 3) provide a detailed description of the steps that they followed to tumble the stones. We have the best experience buying rough from people who are actively involved in rock tumbling.
"Avoid Contamination"
You will use a different size tumbler grit for each step of the tumbling process. If coarse grit gets into your medium grit step, it will scratch up the rocks and you might need to do the medium grit step over again.
Avoiding this type of contamination is easy: just thoroughly clean the rocks, the tumbler barrel, and your tools when you change from one grit size to another.
Another way that contamination occurs is when you include rocks that are brittle, or have a granular texture. These rocks might break or shed grains in the tumbler. These grains and broken pieces can scratch up every rock in the barrel.
Here is a test that we use to detect rocks that will shed grains in the tumbler. We pick up a piece of rough in each hand. We then rub them together while applying a bit of pressure. If we are easily dislodging grains from the rock, we believe that the rock will likely shed grains during tumbling.
This type of contamination is also easy to avoid. Simply examine your rocks before tumbling, and don't tumble suspect rocks in the same barrel with quality rough. Tumble new types of rough or suspicious materials separately.
"Great Results Take Time"
Don't be in a hurry. Spend time doing a great job. If you tumble a batch of rocks through the coarse grit step and they still have a few rough edges or are not nicely rounded, don't hesitate to run them through the coarse grit step again. Also, spend the time needed to thoroughly clean your work area, tumbler barrel, rocks, and tools between steps to avoid contamination.
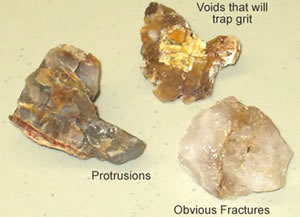
"Garbage in means garbage out." The rocks in this photo do not have the potential to become nice tumbled stones. A rock with voids should be thrown away - the voids will trap grit and contaminate your pre-polish and polishing steps. Protrusions can be trimmed off with a rock saw - and that might yield two nicely rounded rocks.
Inspecting Your Rough
Remember the rule "garbage in means garbage out." Practice that by starting with quality rough, and you will have a chance to produce high-quality tumbled stones. We prepare to tumble by examining our rough rock. If we find porous pieces that might carry grit from one step to the next, we discard them.
Rocks that are fractured will break while tumbling and scratch other rocks in the batch. When we see a fractured rock in our rough, we discard it or break it along that fracture before it is placed in the barrel.
For best results, your tumbler barrel should be loaded with rocks of mixed sizes (from about 1/4 inch up to about 1 1/2 inches in diameter for a 2-pound or 3-pound-capacity barrel). If we need more rocks to fill the barrel to the proper level, we often add rocks that were previously polished but have a rough spot or a blemish that, if ground away, will improve the rock's appearance.
Two final tips before we load the barrel:
1.) Tumbling works best when all of the rocks in the barrel are about the same hardness. If soft rocks are tumbled with harder rocks, the softer rocks will wear away quickly - before the harder rocks are properly shaped and smoothed.
2.) Tumbling works best when all rocks in the barrel are of the same type. If you mix rock types, problems can result - and they will be difficult to diagnose.
The Four-Step Tumbling Process
Now you are ready to begin what most people call the "Four-Step Tumbling Process." This is described below for a rotary tumbler with a three-pound-capacity barrel such as the Thumler's Model A-R1, Thumler's Model A-R2, Lortone Model 3A, or the Lortone Model 33B.
If you are tumbling with the Thumler's Model MP-1 tumbler (which has a two-pound-capacity barrel), you can follow the instructions below, but use about two level tablespoons of grit or polish in each of the tumbling steps (Step 1 through Step 4).
Loading the Tumbler Barrel
Before you load the tumbler barrel, be sure that it is perfectly clean. There should be no grit or rock fragments left in the barrel from a previous tumble. To prevent leaks, the rim of the barrel and the lid should be totally free from grit or rock particles.
Once you have a clean barrel, add enough rock to fill the barrel about 1/2 to 2/3 full. With small tumblers it is best to tumble rocks that are between about 1/4" and 1 1/2 inches in size. If you don't have enough rough to fill the barrel at least 2/3 full, the rocks might be tossed around in the tumbler and bruised. (Varieties of quartz bruise very easily.)
It is best to add a variety of rock sizes to the barrel. If you use only large pieces there will be very few contact points between the rocks and very little grinding will occur. If you add a range of rock sizes the small rocks will fill the spaces between the large rocks, creating many more points of contact between the rocks. Grinding occurs when particles of grit get caught between the rocks - so the more points of contact you have, the more effective the grinding.
When tumbling you will place enough rocks in the barrel to make it about 1/2 to 2/3 full. Then, add about two level tablespoons of grit for each pound of rock. Finally, add enough water to almost cover the rock. Now seal the barrel and place it on the tumbler.
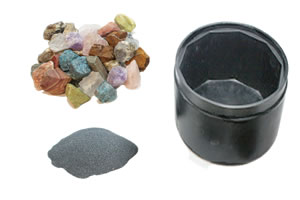
STEP 1 - Coarse Grind
The first step of the four-step tumbling process is to run the rocks in the tumbler with coarse grit. We begin with a barrel that is about 1/2 to 2/3 full of tumbling rough, then add two level tablespoons of coarse grit (we use 60/90 grit silicon carbide) for each pound of rock. Then, add water until the water line is just below the top of the rocks. Seal the barrel and run for about seven days.
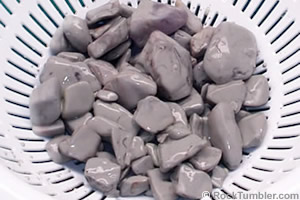
At the end of seven days, open the barrel. You will find a barrel of rocks in very muddy water! Dump the contents into a screen or a colander over a plastic bucket and rinse off every speck of grit and mud. Wear safety glasses to protect your eyes from a splash of mud.

Used grit and rock mud should never be washed down a drain. It can clog your plumbing system. We wash rocks in a plastic colander over a plastic bucket to keep the mud out of the drain.
Inspecting the Rocks:
Now that you have washed the rocks, it is time to inspect them. Your goal is to determine if they are ready to move on to STEP 2, or if another week in STEP 1 would improve their appearance. We almost always tumble the rocks for a second week in coarse grit. We believe that improves their shape and removes more blemishes from their surface. Then, we usually move all of the rocks to the medium grit step.Perfectionist Tumbling:
Some people want to have more control over the tumbling process and only admit excellent rocks into STEP 2. These people sort their rocks into three categories:- 1) those that are ready for STEP 2
- 2) those that could be improved by another week in STEP 1
- 3) those that should be discarded or trimmed and returned to STEP 1
IT IS VERY IMPORTANT TO WASH THE MUD FROM THE ROCKS IMMEDIATELY. If the rock mud is allowed to dry on the rocks, it is almost impossible to wash off.
STEP 2 - Medium Grind
The second step of the four-step tumbling process is to run the rocks in the tumbler with medium grit. Before you begin it is extremely important to clean all of the coarse grit and rock mud from the rocks, from the tumbler barrel, and from the barrel lid. It is very important to avoid having even a few grains of coarse grit in the medium grind step.
During STEP 1, your rocks were reduced in size. When you return them to the barrel for STEP 2, they will probably not fill the barrel to the recommended 1/2 to 2/3 full level. If the barrel is only 1/2 full or less, the rocks can be tossed violently around in the tumbler. This can break or damage fragile materials such as quartz. So, when tumbling quartz or another fragile material, we always add enough ceramic media (or some rocks that need a little more tumbling) to bring the barrel up to the 1/2 to 2/3 full level.
(This is less important with varieties of chalcedony because it is a more durable material. However, if your tumbler barrel travels at more than about 60 revolutions per minute, we recommend adding enough ceramic media to bring it up to the 2/3 full level regardless of what type of rock is being tumbled.)
After your barrel is at the proper level, add two level tablespoons of medium grit (we use 110/220 grit or 150/220 grit silicon carbide) for each pound of rock (and ceramic media). Then add water until the water line is just below the top of the rocks. Now tumble for seven days.
At the end of seven days, open the barrel and clean all of the grit from the rocks, barrel, and lid (don't let any grit go down the drain). At this point in the tumbling process, a dry rock should have a smooth frosted surface. Inspect the rocks, looking for any that are cracked or broken. If you find any, these rocks should be discarded or saved for the next time you run Step 1.
Used grit and rock mud should never be washed down a drain. It can clog your plumbing system. We wash rocks in a plastic colander over a plastic bucket to keep the mud out of the drain.
STEP 3 - Fine Grind / Pre-polish
The third step of the four-step tumbling process is a week in a fine grit such as 600 grit or 500 grit silicon carbide. Begin with a barrel that is perfectly clean. Place your rough and any ceramics that are with them into the barrel, and add two level tablespoons of fine grit per pound of material. Then add water until it fills the barrel up to just below the top of the rocks. Run this for about seven days, and then do a thorough cleaning of the rocks, the barrel, and the lid.
Remove any rocks that have broken or show signs of fracturing. At this point in the process, the rocks should be extremely smooth, and some of them might display a slight luster.
Be very clean! Before you replace the lid on your barrel, be sure that both the lid and the rim are perfectly clean. This will allow the lid to fit tightly and prevent leaks.
STEP 4 - Polish
Now you are down to the final step - the one that puts a bright shine onto your tumbled stones. Be sure that the rocks and the equipment are perfectly clean. (Some people have an extra barrel that they use only for the polishing step.) A few specks of grit could ruin a great polish.
Place the rocks in the barrel and add two level tablespoons of rock polish (we use TXP aluminum oxide powder for almost all of our rotary tumbling) per pound of material in the barrel. Add water to just below the top of the rocks. Then, close the barrel and run for about seven days.
When you finish this step, your rocks should be bright and shiny. If they are, congratulations! Admire them for a while and share them with your friends.
If the stones have an extremely smooth surface but do not shine, they might need to be cleaned up using the burnishing step described below. If they have scratches on them, then you will need to go back to STEP 2 and repeat the medium grind, fine grind, and polishing steps.
Burnishing
Sometimes our stones are a little "hazy" when they come out of the polish, or small particles of polish are in micro-size crevices. We shine and clean them up by tumbling for an hour or so in soapy water. This is called "burnishing."
To burnish, we place the stones in our polish barrel with the normal amount of water, and then we add about 1/2 tablespoon of grated "Ivory" bar soap for each pound of rock (we use "ORIGINAL" Ivory soap - don't use a soap with aloe or abrasive or any other additive - honestly, just get a bar of Ivory soap). Burnishing usually makes the tumbled stones a little brighter, but sometimes it really kicks up the shine.
Keeping Records
It is easy to forget what day you started the tumbler or what type of grit was used - especially if you are running multiple tumblers. Keeping records will keep you on track and provide a history that will help you learn. We record material tumbled, start date, abrasive used, media used, finishing date and duration, along with any comments or observations about the results.
To help you with your record keeping, we have prepared a printable tumbling log.
We usually have multiple tumblers running here, and we record every barrel of rock that we tumble on these logs. Even if your memory is better than ours, record-keeping is a good idea. When you learn something that works or something that doesn't, you will have it recorded. This information can help you repeat great results and avoid repeating bad ones. Also, we have trouble remembering which day a barrel of rocks was started. Using the log takes away the chance of forgetting.